This homemade pita recipe is a game-changer! We’ve all had that dry pita bread from the grocery store. You know, the kind that crumbles when you try to open it to put the filling inside? This recipe is made with very basic ingredients and so easy to make. If you follow my recipe you will end up with the softest pita bread that you’ve ever had. Perfect for sandwiches, dipping in stews, party platters, or for slathering with butter and honey and enjoying with a cup of tea.

Watch the Video Tutorial Here:

Basic Pita Bread Ingredients:
- all-purpose flour
- salt
- a little granulated sugar
- yeast
- water
- milk
- olive oil
- semolina flour
That’s it! Basically, if you’ve followed my blog for a little bit, these are common pantry staples that are featured in many of my recipes.

The Method:
Whenever I’m working with a recipe that calls for yeast, I always proof it. Because there’s nothing worse than skipping this step just to find out that all of the ingredients went to waste because the yeast was old and inactive. Yeast is the magical ingredient that makes the dough soft and makes it rise.
So, place the yeast, lukewarm water, lukewarm milk, the sugar, and a little bit of flour in a mixing bowl along with the yeast. Give it a mix and set it aside for about 8 minutes or until you see a puffy cloud form on top of the mixture. Once you see that, the yeast is good and ready. You may proceed with the recipe.
Note: This recipe can be kneaded by hand in a large mixing bowl. However, if you own a stand mixer it makes life so much easier. This is the time to use it. The Kitchen Aid mixer that I own can be purchased right here.
Place the flour and salt in a bowl and whisk it together. Add the flour mixture to the yeast mixture along with the olive oil and knead it with the dough hook attachment for about 12 minutes. The dough will still be slightly sticky but more on the tacky side and it should be soft. Resist the urge to add too much flour.
However, if you are kneading it by hand, add enough flour until it is tacky and still very soft.
Place the kneaded dough in a bowl that has been greased with olive oil. Toss to coat the dough and cover with plastic wrap or with a kitchen towel. Set aside in the warmest part of your home until it has doubled in volume. This takes about an hour.
The Secret to the Pocket:
Once the dough has risen and has doubled in volume it’s time to shape the pitas.
Add flour to your work surface and separate the dough into 10 equal portions. Roll each portion into a ball using the palm of your hand. See the video for the demo.
Then, using a rolling pin, roll out each portion of dough into a 6-7 inch circle. Use plenty of flour to do this. If the dough sticks to the surface and is uneven, it will not form a pocket when it is cooked. The secret lies in rolling the dough out evenly and not too thin. Unlike with other bread recipes, in this case, flour is your friend.
Sprinkle some semolina flour onto baking trays or on the countertop. Place each pita circle on top of the semolina and cover them with a clean kitchen towel for 30 minutes until they puff up slightly. The semolina flour will keep them from sticking and will add some nice texture to your bread.
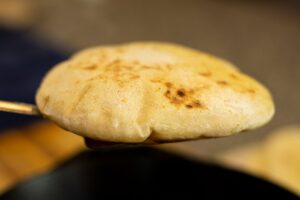
There are two ways to cook the pita: in the oven or on the stovetop. I prefer cooking them on a cast-iron skillet on the stovetop. They take 2-3 minutes each.
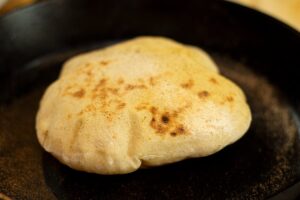
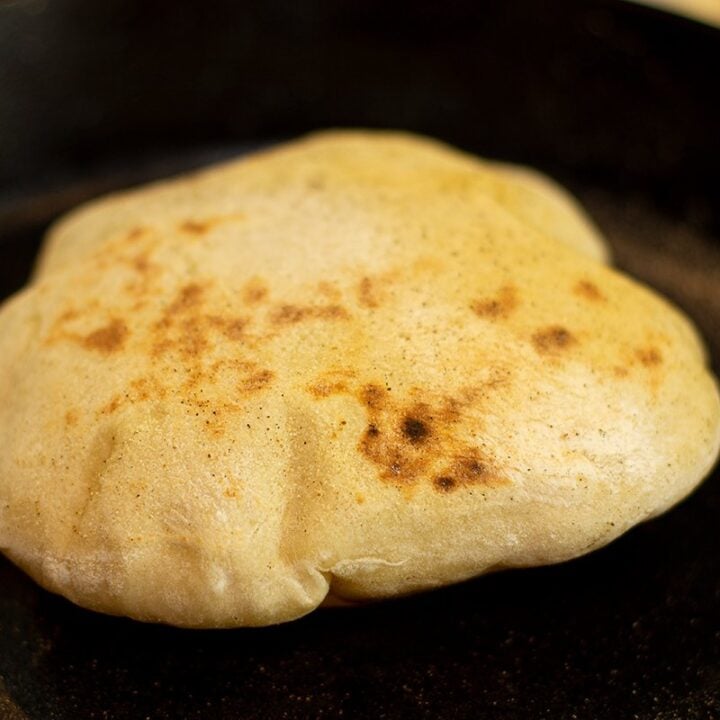
Heat a cast-iron skillet over medium heat and place a pita circle inside of it. Flip it after 20-30 seconds. Continue to flip it every 30 seconds. After the third flip, it should start to puff up. This is how the pocket forms!! A magical moment.
The Stovetop Method:
If the pita begins to puff up on one side and then stops midway, there is probably a hole on the other side. Find that hole and using a spatula, press it slightly to seal the hole. Then, you will see it puff up all the way. Don’t worry if a few of the pita breads do not puff up. They will get better with practice. Also, if it is taking too long for them to puff up, increase the heat slightly. Then, decrease the heat so that it is back to medium for the next pitas.

The Oven Method:
Preheat the oven to 525 °F, 270 °C.
Place the pitas on baking trays that are lined with parchment and have been sprinkled with semolina flour.
Bake the pitas until they puff up and create the pockets. This takes about 4 minutes. Keep in mind that they will not develop too much color and will stay pale.
Remove the trays from the oven and allow the pitas to cool. Serve immediately and store any leftovers in an airtight container in the refrigerator up to one week or in the freezer for up to 3 months.

Purchase your kitchen essentials using my affiliate links to support my work without costing you anything extra. Thank you!

Once the pitas are ready use them to make delicious sandwiches with:
- Falafel
- Greek-American Gyros
- Chickpea Patties Sandwiches
- Leftover Lamb Pitas
- Chicken Souvlaki
- Chicken Gyros
- Chicken Shawarma

Serve the Pitas on a Mezze board with delicious dips:

The Best and Softest Homemade Pocket Pita Bread Recipe
This homemade pita recipe is a game-changer! We've all had that dry pita bread from the grocery store. You know, the kind that crumbles when you try to open it to put the filling inside? This recipe is made with very basic ingredients and so easy to make. If you follow my recipe you will end up with the softest pita bread that you've ever had. Perfect for sandwiches, dipping in stews, party platters, or for slathering with butter and honey and enjoying with a cup of tea.
Ingredients
- The Dry Ingredients:
- • 4 and ¼ cups (648 g) all-purpose flour
- • 2 teaspoons salt
- The Wet Ingredients:
- • 1 cup (250 ml) lukewarm water
- • 1 cup (250 ml) lukewarm whole milk
- • 2 teaspoons active dry yeast
- • 1 tablespoon all-purpose flour
- • 2 teaspoons granulated sugar
- • 2 tablespoons olive oil
Instructions
- Combine the dry ingredients in a large bowl and whisk together. Set aside.
- In the bowl of a tabletop mixer that is fitted with the dough hook attachment, add all of the wet ingredients except for the olive oil. Allow the yeast to activate for 8 minutes. As soon as a puffy cloud forms at the top of the mixture, the yeast is active.
- Add the olive oil along with all of the dry ingredients and knead on low speed for 12 minutes.
- Lightly grease a large bowl with 1-2 tablespoons of olive oil and transfer the dough to the bowl. Toss to coat in oil and cover with plastic wrap. Set aside in the warmest room of your home to rise until doubled in volume. About 1 hour.
- Cut the dough into 10 equal portions.
- Lightly flour your work surface and roll each portion of dough out into about 6-7-inch circles. Keep their thickness even. Use as much flour as needed to roll them out evenly.
- Sprinkle some semolina flour onto the work surface and place each rolled out piece of dough on it.
- Cover the dough with a clean kitchen towel and allow it to rise for 30 minutes.
- Warm a cast-iron pan over medium heat.
- Cook each pita 20-30 seconds per side and continue cooking until it puffs, and the pita is fully cooked (see video).
- If the pita is not puffing up, increase the heat a little bit.
- Transfer the pitas to a plate and serve immediately.
- Leftover pitas can be stored in an airtight bag or container and kept in the freezer or the refrigerator until ready to use.
Notes
To make whole wheat pitas, substitute 2 cups of whole wheat flour for 2 cups of all-purpose flour. This dough can be kneaded by hand. Knead it until it is no longer sticky. It should stay soft and tacky.
i tried to print but every time i tried to it was blank? i thought it was my phone but i tried on my computer to and it did the same thing. going to try this recipe soon! thank you
Hi Cathy, We’re working hard to update the site and everything should be functioning optimally by next Saturday. Right now, the print function is not working. I’m so sorry about that.
Due to the pandemic and being confined to my home, I have been cooking and experimenting with different recipes. After trying over 10 different pita bread recipes I was just about to call it quits until I found your video on yahoo. I just finished making a batch and wanted to let you know that I finally found the perfect one!! I cooked them in my cast iron skillet on the stove top. Even the ones that did not puff up, were so soft and did have the pockets. I am enjoying going through all of your recipes and wanted to thank you!
I made these a couple of days ago. they were very easy to make , soft and delicious!
From now on, I will always try to make the time to make these. I made a dozen. We like a smaller
size.
I tried this recipe and it was really the best pita pocket recipe ever. Thank you so much for sharing your wonderful recipes on this website.
This is really informative, thank you!
HI, would I be able to need this by hand? I don’t have a mixer with a dough hook but would love to try this recipe out. Thankyou!
Yes, if it gets too sticky, grease your hands with oil and the counter as well. It will make it easier to knead without having to add too much flour.
do you have any cookbooks for sale in the uk whit these receipts in.
I got a new food processor that handles dough. Do you know what changes to the recipe I would have to make to use the processor for this recipe. Love your recipes…very much like home! Blessings, JJC
Hi JJ! I’ve never made bread dough in a food processor. I suggest following the recommendations in the instruction manual. I’d love to hear how it turns out. Best regards, Dimitra
Can milk be eliminated from this or your flatbread pita bread recipe ? If so, would milk be compensated by adding more water and by how much ? if not, any alternatives ? Thanks for the excellent videos
I made this recipe today and yes they are delish! I should have read you recipe again because I didn’t roll them out right, so they are flatbread not pockets. Not a problem at all, they are very good. I know for the next time. ty
hI! BEAUTIFUL video of making the pita bread. I would like to know how you prepared your cast iron skillet. Did you use olive oil or some other oil? I can see that it is shiny as you put the first pita dough in. Did you wipe it with something?
hI! BEAUTIFUL video of making the pita bread. I would like to know how you prepared your cast iron skillet. Did you use olive oil or some other oil? I can see that it is shiny as you put the first pita dough in. Did you wipe it with something?
Very well done website and u tube videos. I have made the non-yeast breadsticks and the feta bread and both were outstanding. However I won’t return to this site again or try to copy recipes. Today while trying to print pita pocket recipe, I find it is impossible unless I agree to cookie policy which, of course, means more ads popping up and my information being passed around. Even with agreement, the caption, “privacy and cookies” printed and is blocking part of the recipe. This is getting ridiculous and with all the popups it is almost impossible to read a recipe.
I’m very sorry that you feel this way. The cookie policy has to be on my site as per the law. As for the ads, its the way bloggers get paid for the free content that they put up. I’m glad that you’re enjoying my recipes. Have a great weekend.
What is semolina flour n why use it on tray n surface top. Can I use all purpose flour
Semolina flour is a course wheat flour. You can leave it out. It gives a nice little crunchy texture to the bottom of a bread similar to pizza. Hope that helps!
I just tried this recipe and they didn’t pop up for me, but they are so delicious, I’m not sure if I want them to inflate 🙂 Do you know what could have gone wrong for me? I am wondering if I made them too thick…I did use a lot of flour when I was stretching them out but maybe the brand of flour makes a difference? Or is there a special technique when making them into discs by hand? Anyway, our family loved them as they were because they were soft and delicious; for sure they won’t last the night.
I Hello,
,I would like to prepare the dough, let it do a slow rise in the fridge overnight and bake the following day. Will that be possible? Any tips?
Yes, that would work. As long as the dough comes to room temperature before shaping the pitas 🙂 Enjoy!
Excellent recipe. Made it and they turned out great. Even my company loved it. Will be making them again.
This is a great recipe! I’ve made it about three time and I get perfect pockets almost every time. However, I have some bread flour that I want to use up. Can I substitute that for the regular flour? Many thanks for your recipe.
Yes!! You can knead it for 8 minutes if using bread flour 🙂
Thank you for a great recipe. I found after a while the dough just seems to wrap around the hook on my kitchen aid mixer. Is this normal?
WILL this work with almond flour??
I’m not sure. Have never tried it. Please let me know how they turn out if you give it a try.
We also don’t drink milk – what can be a good substitute – unsweetened almond milk? Obviously we don’t use sugar or wheat products so I guess it will work with erythritol.
I will give your pita recipe a try. However, every bag of King Arthur Flour says 1/4 cup = 30 grams, making 1 Cup = 120 grams. Therefore 4 1/4 cups should be 510 grams but your recipe says 648 grams which is over 1 cup more than most measurements.
Which number do I use?
Have you tried baking the pitas instead of using a cast iron skillet one at a time?
I made these yesterday. I froze five. Needless to say the five frozen came out of the freezer first thing this morning. Everybody says the best. These are the BEST!
In the video you say 618gr. Flour. In the recipe it says 648gr. Which one is correct?
start with 618g and if it’s still too sticky you may add up to the 648g 🙂
Hi! I was so excited to try this recipe. The dough came out beautiful, but when I went to cook them on stovetop, they really didn’t puff up (only like two out of the twelve). I will try again another time. But, what did I do with the super flat ones??…fried them and made pita ‘chips’. I made your tzatziki (delicious), so we’ll eat that with the ‘chips’. Thx for sharing your expertise, love watching you teach us!
The print function is still not working. 🙁 🙁 🙁
So sorry about that. I tested it on 2 of my devices and it is working…
By far the best pita recipe I’ve tried to make. The texture is perfect and the dough pooped up perfectly! Thank you!
How do you measure the flour (cups or scale)? I’ve tried this twice already and can’t figure out what I’m doing wrong because the dough is always soft and beautiful, but once I roll and rise, they all stick and if I add flour, they get dry and crackly. I think the flour measurement is off somehow because I’m already almost done with a 5lb bag. If I’m weighing flour, shouldn’t it be closer to 500g? I really want some delicious soft pita bread like your video! 🙁
Finally found the best pita recipe even though I didn’t get them to puff up they still taste great and are soft too.. I will try again for the pockets – I think I didn’t roll them correctly or may have added too much flour. I added about another cup because they were so sticky. The dough doubled perfectly though. Thank you this will be my pita recipe from now on. Next I will try your tzatziki even though my recipe is great yours looks good too. Then I will check out all of your recipes. I love watching videos of how to. It helps me a lot even though I am in my 70’s I am still learning and loving it. BTW it printed perfectly.
The best Pita bread I have ever made. The measurments are accurate. I substitutede1 cup brown bread flour with 1 cup all purpose flour and it came very well. I used stove top and was lovely to see the dough puffing up. A recipe to keep. Thank you
Hello there dear Dimitra! Today I made this pita recipe. I followed it to the letter, weighed the flour, used a thermometer for the milk and water to the right temperature and they turned out beautiful. Thanks so much for such a well written recipe and video. I will recommend this recipe. 🤗
I have just finished eating the best gyro EVER!
I made your pitas and fill3d with peppers onions and tzatziki (your recipe) OMG..ABSOLUTELY AMAZING!
THANK YOU
Jennifer
To the question about semolina substitutes, you can dust the surface with cornmeal.
The best! First time I made them I didn’t use enough flour and they stuck when they were rising. They were delicious even if all of them didn’t puff up. the 2nd time they were perfect! Thank you.
My old homemade pita recipe was delicious, but the results were a bit stiff and didn’t wrap well, so I was looking for a soft option. I could not get these to puff at all. They were soft and delicious, but the first 4 I made were just really thick and not usable for gyros. (They made a great breakfast the next morning topped with honey maple butter, though!) I pressed the remaining ones thin before putting them in the pan, which produced a much better version for wrapping. I wasn’t planning to split them open anyway, as we never use the pockets, just wrap our homemade gyros. I do wish I could figure out what went wrong, though!
It sounds like you’re almost there with your pita recipe! For pitas to puff properly, a few things are crucial:
1. **High Heat**: Ensure your oven or pan is very hot before adding the dough.
2. **Resting Time**: Letting the dough rest after rolling it out can help.
3. **Thickness**: Rolling the dough evenly and not too thick can make a difference.
4. **Moisture**: Sometimes a bit of extra hydration in the dough helps with puffing.
If you try these adjustments, you might get the perfect soft, wrapable pitas for your gyros!
I am making beautiful fluffy flatbread……but no pockets. What am I doing wrong?
It sounds like you’re doing great with the flatbread, but the pockets can be tricky. Make sure your oven or skillet is super hot before cooking the pita. Also, try rolling the dough evenly to about 1/4 inch thickness—too thick or too thin can affect the pocket formation. And don’t forget to let the dough rest before rolling; this helps the gluten relax, which can improve puffing. Keep at it—you’ll get those perfect pockets in no time!
hi..can i use bread flour instead 😄
Hi! yes of course matter of fact they will come out even better! enjoy
I have been making pitas since I retired and my grandson loves pitas. I lost your recipe and finally found it. I have tried so many recipes that didn’t work. Finally found yours again! I have never made a perfect batch! I did today. My husband never was a fan when I baked them. When you promised every one would raise you were correct. I am over the moon. I baked them in the oven. I used a 2020 face shield so the heat didn’t melt my face. such fun watching them all puff up. Thank you for your work.
Oh, I love this! I can just picture you watching them puff up with excitement—what a great moment! And using a face shield? Genius! So happy you finally got that perfect batch, and even better that your husband enjoyed them too. Keep baking and making those special memories with your grandson! 💕😊
I have been making pitas since I retired and my grandson loves pitas. I lost your recipe and finally found it. I have tried so many recipes that didn’t work. Finally found yours again! I have never made a perfect batch! I did today. My husband never was a fan when I baked them. He is now. When you promised every one would raise you were correct. I am over the moon. I baked them in the oven. I used a 2020 face shield so the heat didn’t melt my face. such fun watching them all puff up. Thank you for your work.
These look great. I’m wondering if I use a cast itin griddle in the oven if the pockets might brown up a bit. I’m anxious to try these. I’m wondering if the recipe would take a couple of tweaks…. Soy or almond milk instead of dairy milk and honey instead of cane sugar. Thanks for the recipe!
Thank you so much! A cast iron griddle in the oven should definitely help the pitas get a nice golden color. As for the tweaks — yes, you can swap in soy or almond milk, and honey should work fine instead of sugar. Just keep an eye on the dough texture and adjust if needed. Would love to hear how they turn out when you give them a try!
would it be possible to do a first rise, form the pitas and then do a slow overnight rise in the fridge.
kenji Lopez-Alt ( The Food Lab) makes bread and pizza dough and let’s it rise in the fridge for 5 days I have tried that with superb results. I once even forgot it was in the fridge and left it for 8 days with delicious results. Wondering if I could do this as well with the pitas? I have a huge crowd coming and a lot if food to prep
. earlier I can start prepping the better.
Love your recipes. thanks
Yes, you can! Let the dough rise once, shape the pitas, then refrigerate overnight (or up to 2–3 days). Bring to room temp before baking. Cold proofing adds great flavor and makes prep easier—perfect for a big crowd.
I’d like to try this but we aren’t eating sugar. Can I substitute with maple syrup or honey or just leave it out entirely?
yes of course! Hope you enjoy 🙂
I made these and they were delicious. I cooked mine in a cast iron griddle in the oven. Two comments. It would be helpful to have a rough weight for the individual dough pieces to make them equal. Mine came out a bit thicker that the photos and took a bit longer to cook. I checked the finished temp of the bread and pulled them out of the oven once they reached about 200 degrees Fahrenheit. Also I would love to see nutritional information of the recipe.
Thanks for sharing this recipe. It was a hit and a soon to be favorite in our house!
Thank you so much for your thoughtful feedback! I’m thrilled to hear that your pita bread came out delicious and is on its way to becoming a family favorite.
You’re absolutely right — providing a rough weight for the individual dough pieces would help make them more uniform. I’ll make a note to add that to the recipe. Cooking in a cast iron griddle is a great method, and checking the internal temperature like you did is such a smart tip for perfect results.
I also hear you on the nutritional information. I’ll look into adding that to the recipe soon so it’s easier for everyone to plan their meals.
Thank you again for trying the recipe and sharing your helpful tips!
Hello, I watched both the recipe video for the Pita Pockets and compared them with the flatbread Pocketless Pita and I cannot discern what makes one puff and the other not. Ingredients are identical… I would pefer to make the flatbread in my cast iron, but am wondering what prevents them from rising. Is it that the flat bread is not allowed to rise a second time? I have been cooking 99 percent of everything I eat for 7 years now, and appreciate you posting these lovely recipes. By the way, look up Hani on Wikepedia, and you will understand what I am hoping to what type of sandwich I am trying to achieve with your flat bread.
That’s a great question and you’re absolutely right that the ingredients are the same. What makes pita puff and form a pocket is not the ingredients but the technique and the heat. Pocket pita is rolled thinner and baked in a very hot environment so the moisture in the dough creates steam and forces the two layers to separate and puff. Flatbread is usually rolled slightly thicker and cooked more gently, often in a skillet, which allows it to stay soft and flexible without creating that steam pocket.
For the cast iron version, the dough is not meant to puff fully. It is usually allowed to rise once, then shaped and cooked without a second rise, and the pan cooking encourages a flatter result rather than a ballooning pocket. That is what keeps it more like a wrap or sandwich bread instead of a pocket pita.
It sounds like you’re doing everything right and I love how intentional you are about your cooking. I’m so glad the recipes have been helpful to you, and I really appreciate you taking the time to write such a thoughtful comment 🤍