Now you can follow my easy recipe to make soft and moist pita flatbread at home. The pitas are made with basic pantry staples and the recipe can be used to make pizza crust! Simple, moist, and delicious.
Watch the Video Tutorial Here:

Why should you make pita bread at home?
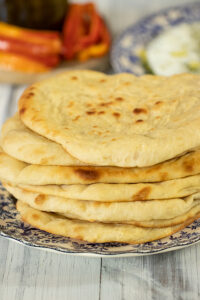
Homemade pitas are soft, aromatic, and far superior to the store-bought varieties. Pita could be sitting on the store shelf for days and by the time that it makes it home, it has dried up and is well, old.
Making pita at home is not only inexpensive but also super easy. Here’s the ingredient list:
- water
- yeast
- sugar
- milk
- yogurt
- olive oil
- all-purpose flour
- salt
That’s it! That’s all you need to make this recipe. A handful of basic staples that you probably already have on hand. Especially, if you cook Mediterranean recipes often.
Can the pita flatbread be made without a stand mixer?
Absolutely! This is a sticky dough and a stand mixer makes things so much easier but, my grandma never had one and she made this all the time. Haha! Use a large bowl, a wooden spatula, and your hands to make the dough and it will be just as good. Since the dough is sticky and hard to handle, drizzle some olive oil onto your hands to help you knead it easily.
If you’re looking for a good stand mixer such as the one that I have, you may purchase it from my Affiliate (Amazon) and support this blog without any additional cost to you. Thank you and here is the link:
Also, here is a link for the dough scraper that I used in the video:

![]()
What should Pitas be served with?
In Greece, these pitas are used to make sandwiches, served with cheese and dips, or for snacking. Here are my favorite ways to serve them:
- with Chicken Souvlaki
- with Gyros
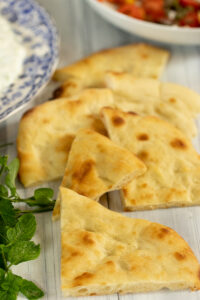
- use them to make Pita Chips
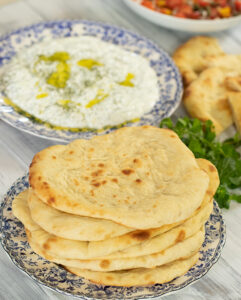
- Serve the pitas alongside tzatziki, hummus, or feta dip
- use the pitas to make pizza
- Serve them with butter and jam for breakfast

Can Pita Flatbread be frozen?
Yes! Store the baked pita in a freezer-safe bag in the freezer for up to 3 months. Never, and I mean never, has it lasted more than a week or two in my freezer so, I can’t say for sure that at the 2 or 3-month point that they will still taste fresh and moist. I’d love to know if you have tried it, what were the pitas like? Post in the comments section 🙂
Thaw the pitas and warm them before serving.
I hope that you will give this recipe a try and if you do, please let me know what you think. Post your questions and comments down below and I will try my best to answer the questions as soon as I can.
Make some pita, call some friends over and enjoy the food, and most importantly the company. Kali Orexi!
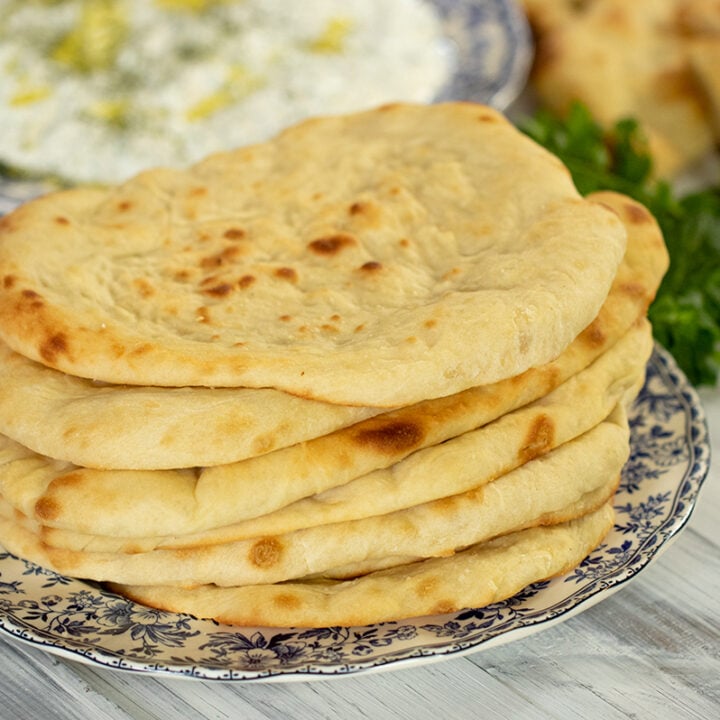
Homemade Flatbread (Greek-Pocketless Pita)
Now you can follow my easy recipe to make soft and moist pita flatbread at home. The pitas are made with basic pantry staples and the recipe can be used to make pizza crust! Simple, moist, and delicious.
Ingredients
- 2 cups lukewarm water
- 2 and ¼ teaspoons active dry yeast
- 3 tablespoons granulated sugar
- ¼ cup lukewarm milk
- 2 tablespoons yogurt
- 2 tablespoons olive oil
- 5 cups (740 g) all-purpose flour
- 2 teaspoons salt
Instructions
- Add the salt and flour to a large bowl. Do not whisk together yet.
- Place the water, milk, yeast, and sugar in the bowl of a tabletop mixer. Add a half cup of flour and whisk together. Set aside for 10 minutes so that the yeast activates. It is active when a foamy cloud appears on top of the liquid.
- Whisk together the flour and salt.
- Once the yeast is activated add the yogurt, oil, and flour mixture. Knead together on low speed for 8 minutes then, increase the speed to medium and knead for 2 more minutes.
- Transfer the dough (it will be very sticky) to a large bowl that has been greased with a few tablespoons of oil. Toss the dough in the bowl to coat with oil and cover with plastic wrap. Set the bowl aside for 45 minutes to one hour or until the dough has doubled in volume.
- Preheat the oven to 525 °F, 275 °C.
- Lightly flour your work surface and transfer the dough on top. Dust with some flour and roll it around so that it is easy to handle, and the top is no longer sticky. The inside will still be sticky. Take care not to add too much flour or the pitas will be dry.
- Cut the dough into 8-10 equal pieces and roll them into rounds. Use as little flour as possible.
- Clean the work surface and add rub some olive oil on it and on your hands. This will make the dough easy to handle.
- Use a rolling pin or your hands to form each portion of dough into rounds.
- Line 2-3 baking trays with parchment paper and transfer the pitas onto the trays.
- Bake for about 6 minutes or until the top of the pitas develop some color or golden spots. For the final minute of baking, you may place the tray under the broiler element to develop more color. Keep a close eye on it so that the pitas do not burn or over bake.
- Transfer the pitas to a plate/tray and serve warm.
Notes
The dough can also be made without a mixer by using a large bowl and a wooden spatula. Then, knead with your hands (slightly oiled). The cooked pitas can be stored in a freezer-safe bag in the freezer for up to 3 months. Thaw them and warm through before serving.
Hi can I make this with ALL whole wheat flour? Thank you. It looks delicious.
You can do that. However, I recommend using half white and half whole wheat flour. It makes a lighter pita. Hope this helps!
Fabulous recipe!!! I just did this with my new Kitchen Aid mixer and wow… what a breeze!! Thanks for the video too as I would not of expected the dough to be THAT wet/sticky so that was helpful to see I wasn’t missing something. I wanted to attach a photo here but I don’t see a place to do that.
Do you ever make these with chickpea flour?
I have never tried that. If you do, please let me know how they turn out.
I have made these twice, I just love them! The second time I cut the dough into 16 pieces so they could be easier to eat. Also tried them as pizza bases, really delicious.
It’s great that you include a how-to video along with the written recipe. These were easy and delicious!!! It’s important to make the dough as flat as possible before baking. Mine came out a little thick but we’ll eat every bite, I’m sure!
….also, should the dough be brushed with olive oil before baking?
Thank you for yummy recipe . Used all the ingredients and method as recipe but my pita cane out hard and dry . Not sure if it was the type of flour I used or what ? What you think 😊
Do you think they will turn out well if pan fried in a little olive oil instead of baked?
Sure! You can definitely make these in a pan on the stovetop. I have a video and blog post on that right here:https://www.dimitrasdishes.com/the-best-and-softest-homemade-pocket-pita-bread-recipe/
This recipe is amazing – light and fluffy – and so very simple. Thank you 😊
This promised to be a ghastly failure on my part! I followed the amounts as instructed but the dough refused to ‘dough’. It was really runny and unmaneagable. I added a ton of flour and still they seemd pretty hopless but I plomped splodges on a baking tray , flattened them as best as possible with a knife and baked them expecting the worst. But they turnd out absolutely delicios. Not a bit elegant and round like Dimitra’s but we all enjoyed them just the same. 😀
I love them and made them last night delicious! Now I’m going to make it whenever I want fresh bread, you are an amazing cook , I also made your tzaki sauce gyro meat, thank you for sharing your recipes
Hi there. I don’t have a stand mixer so just used a spoon. My dough wasn’t sticky like yours, also my bread puffed up. Is this normal? What does the activated yeast mixture look like if activated? I still made them and was very nice. I’ve made it a couple of times now but maybe I need a stand mixer hahaha
I have made this pita more than once now and I can’t stop eating it. My family and I all love it! We are Greek and it is the best Greek pita. I also did them in an iron skillet. Are nutritional facts available for your recipes?
Dimitra you r the best! I love all your recipes and the way you explain. So easy to follow and so complete and rich in content.
I already made pita, tzatziki, Melomakarona, Pastitsio, musaka, ravani and galaktoboureko.
I am excited to try loukoumades for new year.
Thank u sooo mucho! Love u 💗
Cynthia from Paraguay, South America
I just made these now. I used a cast iron griddle to cook them on the stove. The dough was very, very soft. The temptation to use more flour was there, but I refrained, glad I did. I have been baking for 36 years, and often make flat breads, (using sourdough). I followed the recipe to the T. These were by far the best I’ve made! Well done young lady! Thank you for your efforts, they are appreciated!
I’m so glad that you enjoyed these pitas. Thanks so much for your comment, too!! xxDimitra
How about making them on a griddle rather than heating up the kitchen with the oven in hot summer weather. Going into the 90s today in queens, ny.
Υεια σου,Δήμητρα
They came out excellent. Probably 12 pieces would be better. At 10,pieces they were too fat. Three pieces on the half sheet pan were all that would fit. So that’d be four trays full.
The taste and consistency was really good. Maybe try some butter in the dough to help browning. What do you think of that?
🙂
Very excited to try this recipe! I love making shawarma but couldn’t find the right kind of recipe to make pocketless pita. Thanks for the great video with tips to make this a success!
Absolutely delicious and so easy to make! Husband loved them!!
Hi Dimitra thank you for the recipe! I am so excited to try! Can I make it with greek whole milk yogurt or doest it have to be regular yogurt ? Thank you
yes, greek yogurt will work 🙂 Enjoy!
I don’t happen to have plain yogurt on hand very often, do you think I could use sour cream?
Yes, milk will work too 🙂
Hi Dimitra, love your recipes and YouTube videos! For this recipe, are results better in the oven or stovetop? Also, in the oven, do you flip them over half way through?
I think that the results are easier and better in the oven. I don’t flip them when they’re baked in the oven and the process is so much faster too!
Dimitra,
Could you clarify if it is 5 cups of flour total, or five cups plus 1/2 cup when you start the yeast?
Thanks.
Is the half cup of flour that is added to the warm water, yeast, milk, and sugar an additional half cup or is it part of the 5 cups of flour?
it is part of the 5 cups. xxDimitra
I can’t wait to make these .. they look great! I can’t find bread flour in Florida either 🤔Your recipe and video are very good… Thanks it’s just what I’ve been looking for. I bought cooked gyro meat at Costco and been dying for a gyro with all homemade ingredients.
That sounds like it’s going to be *so* delicious! And thank you for the kind words—I’m so glad the recipe and video were helpful. If you can’t find bread flour, you can absolutely use all-purpose flour. Just knead a little longer to develop the gluten for that chewy texture. Enjoy every bite of that homemade gyro—you’re doing it right! 💙🇬🇷 Kali orexi!
I just made these and they were very good and just what I needed for my gyros. Only one question is the recipe called for 5 cups of flour and is that with additional half cup that isn’t mixed with salt?
I made these fo gyros and froze the rest . They were fantastic even frozen I put them in toaster and had Bobaganush dip and I think they tasted even better!
That sounds delicious!
This recipe is a winner! Thank you for sharing it.