The mini Greek chicken puff pastry kotopitakia pies everyone always asks me for!
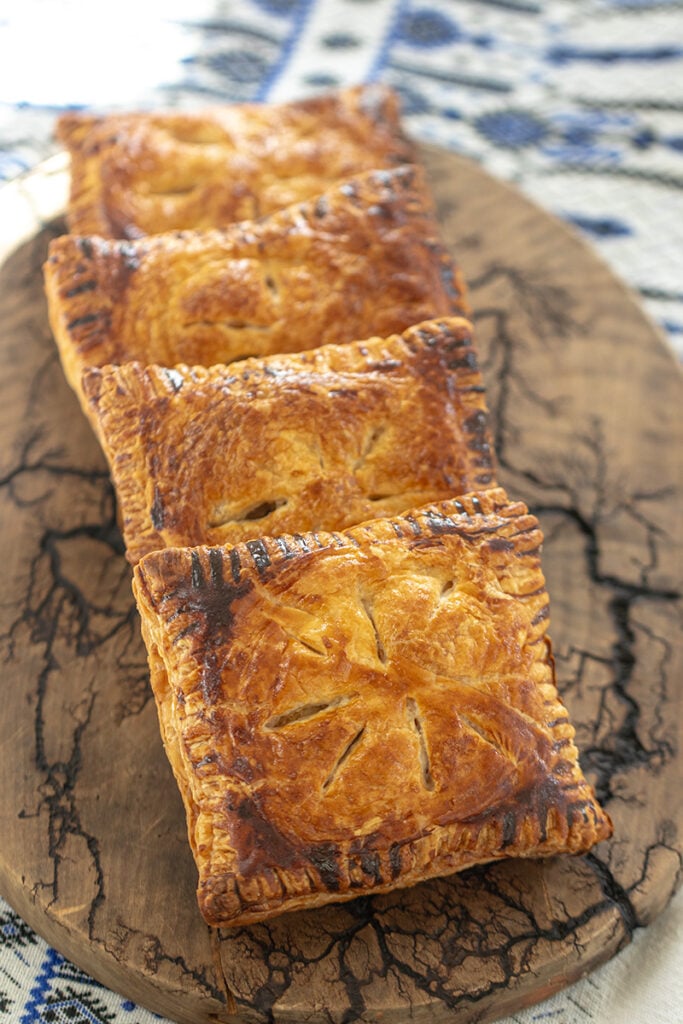
These mini kotopitakia are a puff pastry version of the classic Greek chicken pie. Flaky, golden pastry is filled with a creamy chicken and cheese filling flavored with herbs and just a touch of heat. They’re easy to make, freezer-friendly, and perfect for hosting, snacking, or stocking your freezer for busy days.
Who doesn’t love flaky, buttery puff pastry with a creamy filling loaded with Greek flavor? These are simple, freeze beautifully, and are a lifesaver when you have last-minute guests. The buttery puff pastry bakes up crisp and airy, while the creamy chicken filling stays rich, savory, and packed with Mediterranean flavor. I love making my mini kotopitakia in rectangles instead of circles because it avoids puff pastry waste and makes assembly much easier. However, I’m all about giving you choices!
Why You’ll Love These Mini Kotopitakia!
Flaky, buttery puff pastry
Tender, juicy chicken
Warm, briny feta
Creamy, herby
Oniony filling

What are the ingredients for mini kotopitakia or Greek chicken puff pastry pies?
Chicken thighs -Chicken thighs stay juicy and flavorful after baking and shredding. Their richness makes the filling more tender compared to chicken breast.
Salt and freshly ground black pepper -seasons the chicken and enhances the flavor of the filling perfectly.
Drizzle of olive oil -helps the chicken roast evenly and adds subtle richness.
What’s in the filling?
Olive oil -or butter used to sauté the aromatics. Olive oil keeps it classic and Mediterranean; butter adds extra richness.
Onion -finely diced to add sweetness and depth. Cooking it until lightly golden builds flavor.
Scallions -finely sliced to provide fresh, mild onion flavor that balances the richness of the cheeses.
Cream cheese -softened to room temperature to create the creamy base that binds the filling together. The warmth of the chicken helps it melt smoothly into the mixture. This isn’t traditional in Greece, but it’s my shortcut to avoid making traditional bechamel sauce. Plus, I love the creamy texture it provides to the filling. You can try ricotta, too.
Feta cheese -crumbled to add salty, tangy, and slightly briny flavor to each bite.
Dried thyme -fresh, earthy, herb that pairs beautifully with chicken and feta.
Crushed red pepper flakes -adds gentle heat, but you can adjust the amount to your preference.
Salt and freshly ground black pepper -always taste and adjust. Feta adds saltiness, so you may not need much additional salt.
What kind of pastry do I need?
Puff pastry -thawed store-bought puff pastry keeps this recipe simple while delivering super flaky layers, but if you can get yours at a restaurant supply store, the sheets are even bigger.
Egg yolks plus 3–4 tablespoons milk -beaten together to form an egg wash to give the mini pies a glossy, deeply golden finish.
Make-Ahead Hosting Tip: Create a Beautiful Mediterranean Table with a Refreshing Citrus Drink
These mini kotopitakia are one of my favorite make-ahead hosting tricks. I bake them, let them cool completely, then freeze them in a single layer so they’re ready whenever I need them. When last-minute guests show up or I’m hosting a dinner party and want something warm and comforting to serve right away, I just reheat them straight from the freezer until golden and crisp. It takes the stress out of hosting and lets you enjoy your guests instead of being stuck in the kitchen.

How do I prepare the chicken?
Preheat the oven to 400°F. Place the chicken thighs on a baking sheet, drizzle lightly with olive oil, and season generously with salt and pepper. Bake for about 25 minutes, or until fully cooked and tender. Remove from the oven and shred the chicken with two forks while still warm. Set aside.
What’s the best way to soften the onion?
In a skillet, heat the olive oil or butter over medium heat. Add the diced onion and cook until soft and lightly golden, about 5 minutes. Add the scallions and cook for another minute, just until fragrant. Remove from heat.
How do I make kotopitakia filling?
While the onion mixture is still warm, transfer it to a large bowl. Add the shredded chicken, cream cheese, feta, dried thyme, crushed red pepper flakes, and a little black pepper. Mix well until everything is evenly combined and creamy. Taste and adjust seasoning if needed. The warmth of the chicken will help the cream cheese melt and bind the filling.
How should I cut the puff pastry?
Unroll each puff pastry sheet and cut into 12 equal rectangles. To do this, cut each sheet lengthwise into 3 strips, then cut each strip crosswise into 4 pieces. This gives you 24 rectangles total with no waste.
What’s the best way to fill the pies?
Place about 2 tablespoons of filling on one half of each rectangle, leaving a small border around the edges. Brush the edges lightly with egg wash, fold over to form a smaller rectangle, and press to seal. Crimp the edges with a fork.

Do I need to chill my pies before baking?
Transfer the kotopitakia to parchment-lined baking sheets. Brush the tops with egg wash. Chill in the refrigerator or freezer for 15–20 minutes. This helps the puff pastry hold its shape and rise properly in the oven.
How long do I bake the pies?
Bake for 20 to 25 minutes, or until puffed and deeply golden. Allow them to cool slightly before serving.
What’s the best way to serve Mini Greek Chicken Puff Pastry Kotopitakia Pies?
It’s hard not to eat a ton of these by themselves, but you can serve them with soups, salads, or your favorite dipping sauces. I love to dip mine in creamy tomato soup!
Can I make these ahead of time?
These mini kotopitakia are perfect for entertaining because they can be fully assembled ahead of time and frozen unbaked. Arrange them on a baking sheet, freeze until solid, then transfer to freezer bags. Bake straight from frozen at 375°F, adding 5 to 8 extra minutes to the baking time. Serve warm and crisp with no last-minute stress.
What pie shapes work best?
Rectangles are my preferred shape because they eliminate puff pastry waste and speed up assembly. Each 15 x 10-inch puff pastry sheet can be cut into 12 equal rectangles with no scraps. If you prefer a round, pithivier-style shape, cut the puff pastry into 3 to 3½-inch circles. Fill 12 circles with the chicken mixture, brush the edges with egg wash, and top with the remaining circles. Press to seal and crimp with a fork. Bake as directed. Keep in mind that this method creates puff pastry scraps, which I don’t recommend re-rolling since it affects how the pastry puffs. Any leftover puff pastry scraps can be baked into simple cheese or sesame twists.

Do you have more hand pies?
Tiropitakia Kourou (Greek Cheese Pies with Yogurt Dough)
Greek Cheese Pie Triangles: Tiropitakia
Mizithropitakia: Greek Sweet Cheese Pies
Kimadopitakia: Greek Phyllo Pies with Beef & Herbs
Eliopitakia: Greek Mini Olive Pies
Hortopitakia: Mini Pies from Crete filled with Greens
Spanakopita: Greek Spinach & Phyllo Triangles
Watch the Video

Mini Kotopitakia (Greek Chicken Puff Pastry Pies)
These mini kotopitakia are a puff pastry version of classic Greek chicken pie. Flaky, golden pastry is filled with a creamy chicken and cheese filling flavored with herbs and just a touch of heat. They’re easy to make, freezer-friendly, and perfect for hosting, snacking, or stocking your freezer for busy days.
I love making these in rectangles instead of circles because it avoids puff pastry waste and makes assembly much easier.
Ingredients
For the chicken:
- 1½ pounds chicken thighs
- Salt and freshly ground black pepper
- A drizzle of olive oil
For the filling
- 2 tablespoons olive oil or butter
- 1 small onion, finely diced
- 2 scallions, finely sliced
- 8 ounces cream cheese, softened
- 4 ounces feta cheese, crumbled
- 1 to 2 teaspoons dried thyme
- ¼ to ½ teaspoon crushed red pepper flakes, to taste
- Salt and freshly ground black pepper, to taste
For the pastry
- 2 sheets puff pastry, thawed (each 15 x 10 inches)
- 2 egg yolks plus 3-4 tablespoons milk, beaten, for egg wash
Instructions
Preheat the oven to 400°F.
Place the chicken thighs on a baking sheet, drizzle lightly with olive oil, and season generously with salt and pepper. Bake for about 25 minutes, or until fully cooked and tender. Remove from the oven and shred the chicken with two forks while still warm. Set aside.
In a skillet, heat the olive oil or butter over medium heat. Add the diced onion and cook until soft and lightly golden, about 5 minutes. Add the scallions and cook for another minute, just until fragrant. Remove from heat.
While the onion mixture is still warm, transfer it to a large bowl. Add the shredded chicken, cream cheese, feta, dried thyme, crushed red pepper flakes, and a little black pepper. Mix well until everything is evenly combined and creamy. Taste and adjust seasoning if needed. The warmth of the chicken will help the cream cheese melt and bind the filling.
Unroll each puff pastry sheet and cut into 12 equal rectangles. To do this, cut each sheet lengthwise into 3 strips, then cut each strip crosswise into 4 pieces. This gives you 24 rectangles total with no waste.
Place about 2 tablespoons of filling on one half of each rectangle, leaving a small border around the edges. Brush the edges lightly with egg wash, fold over to form a smaller rectangle, and press to seal. Crimp the edges with a fork.
Transfer the kotopitakia to parchment-lined baking sheets. Brush the tops with egg wash. Chill in the refrigerator or freezer for 15-20 minutes.
Bake for 20 to 25 minutes, or until puffed and deeply golden. Allow them to cool slightly before serving.
Notes
Make-Ahead & Hosting Tip
These mini kotopitakia are perfect for entertaining because they can be fully assembled ahead of time and frozen unbaked. Arrange them on a baking sheet, freeze until solid, then transfer to freezer bags. Bake straight from frozen at 375°F, adding 5 to 8 extra minutes to the baking time. Serve warm and crisp with no last-minute stress.
Notes & Variations
Chill Before Baking: For the best puff and flaky layers, chill the assembled kotopitakia for 15–20 minutes in the refrigerator or freezer before baking. This step helps the puff pastry hold its shape and rise properly in the oven. If you skip chilling, the pies tend to spread and bake up flatter instead of tall and puffed.
Shapes: Rectangles are my preferred shape for these mini kotopitakia because they eliminate puff pastry waste and make assembly faster. Each 15 x 10-inch puff pastry sheet can be cut into 12 equal rectangles with no scraps.
If you prefer a round, pithivier-style shape, cut the puff pastry into 3 to 3½-inch circles. Fill 12 circles with the chicken mixture, brush the edges with egg wash, and top with the remaining circles. Press to seal and crimp with a fork. Bake as directed. Keep in mind that this method creates puff pastry scraps, which I don’t recommend re-rolling since it affects how the pastry puffs.
Any leftover puff pastry scraps can be baked into simple cheese or sesame twists.
Recommended Products
As an Amazon Associate and member of other affiliate programs, I earn from qualifying purchases.
-
 Nordic Ware Natural Aluminum Commercial Baker's Quarter Sheet, 2-Pack
 -
Nordic Ware Natural Aluminum Commercial Baker's Half Sheet, 2 Count (Pack of 1), Silver
-
CASABREWS Ultra Espresso Machine with LCD Display, Powerful Milk Frother and Customizable Brewing Temperature, Provides Barista-Level Lattes and Cappuccinos
-
Breville BOV900BSS Smart Oven Air Fryer Pro and Convection Oven, Brushed Stainless Steel


Leave a Reply