The Ultimate Tsoureki guide will solve all of your tsoureki-making conundrums. In this post, I answer the most common questions that have been sent to me on Youtube, Facebook, Instagram, email, and on this blog. I think I got everything covered in this post and I hope that it helps you make this delicious sweet bread with confidence!
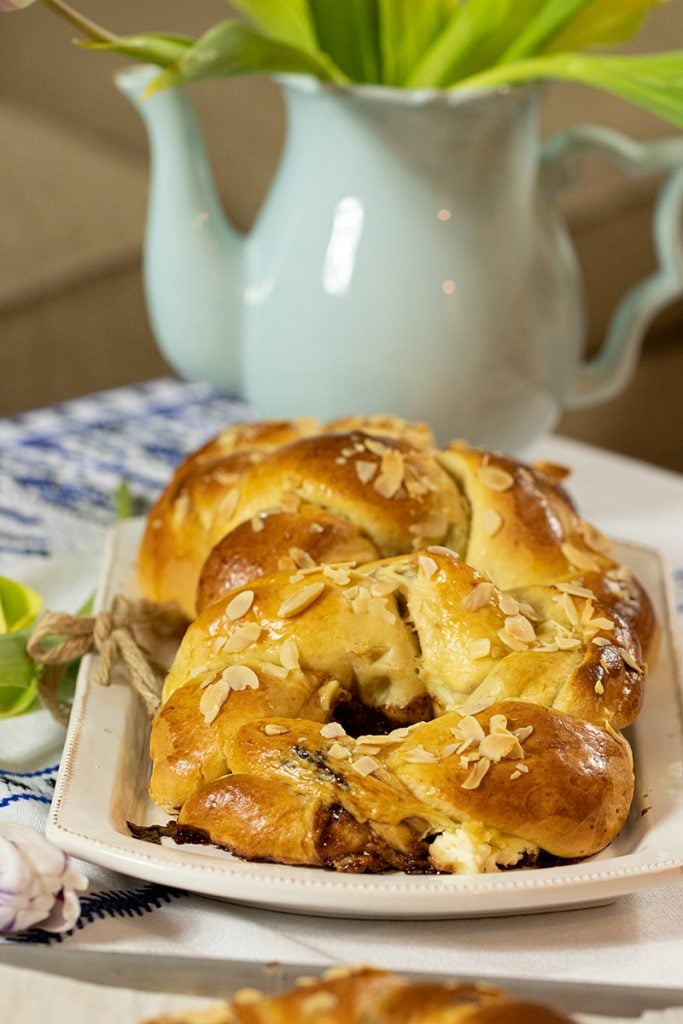
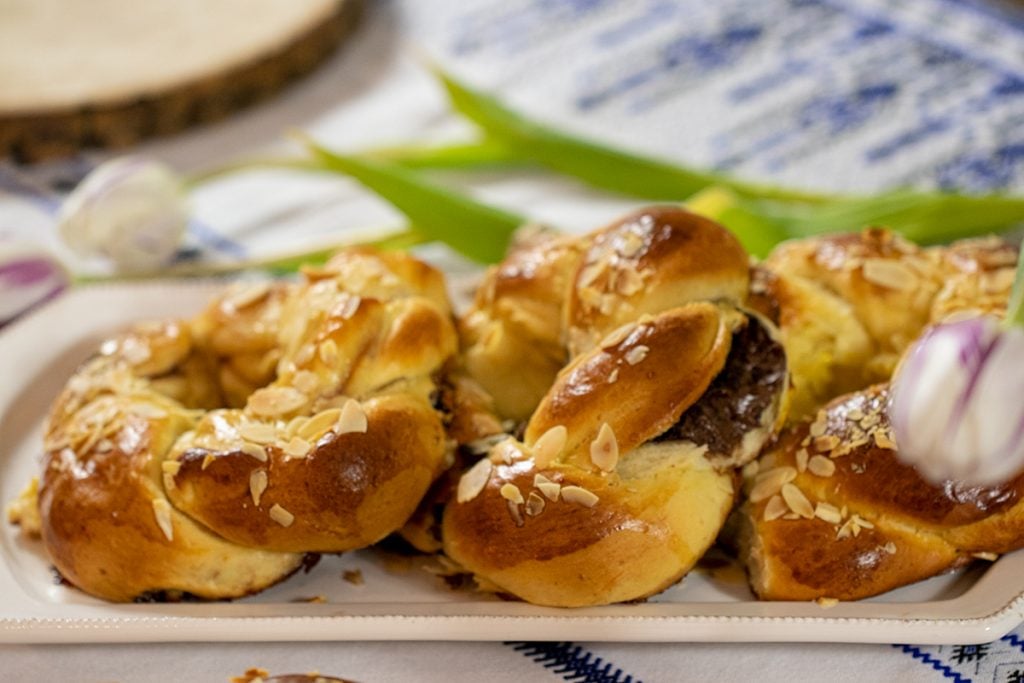
Here’s the video tutorial for Stuffed Tsoureki & Plain

Here’s the Video for The Braided Classic Tsoureki

Here are some of the most common questions/problems that people run into when making tsoureki for the first time.
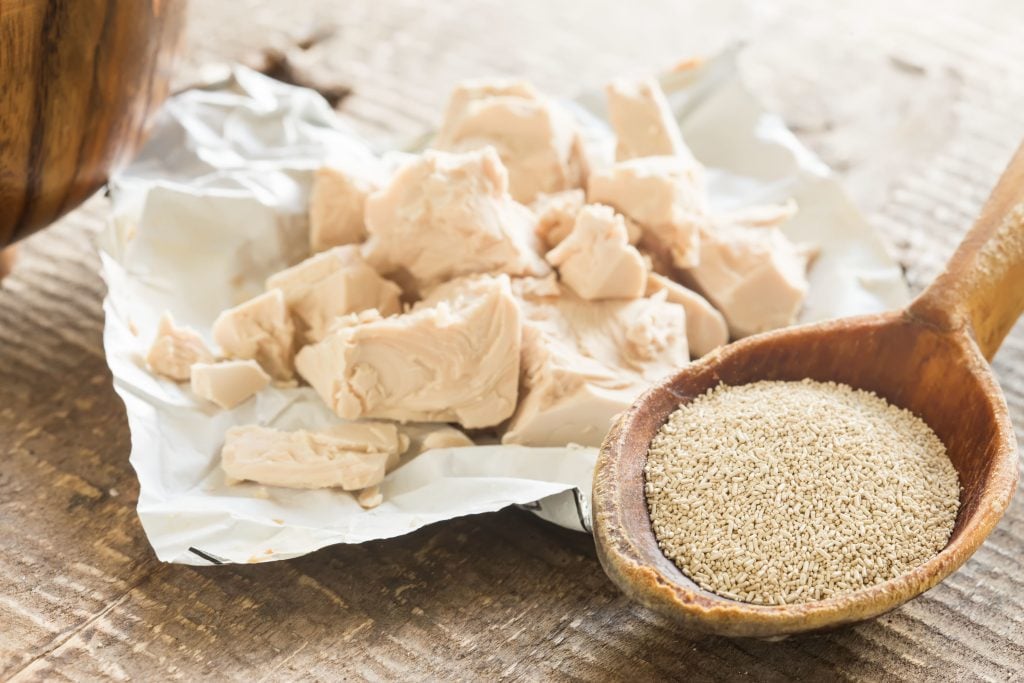
Can fresh yeast be substituted for instant/active dry yeast?
Yes, absolutely. Use whichever type of yeast that you prefer or that you already have on hand. Active dry yeast and instant yeast are interchangeable. My recipe calls for 1 tablespoon of either. I ALWAYS proof it to make sure that it is active and alive. This just means that I create the starter (milk, yeast, sugar, and flour) and set it aside for around 8 minutes. As soon as a cloud forms on top that’s how I know that the yeast is alive and well and will help my dough rise.
If a puffy cloud does not form on top, do not even bother with the recipe. Get a new container of yeast and start over. Otherwise, the dough will not rise. We will cover that problem below.
As for using fresh yeast as a substitute for the dry yeast:
- A larger quantity of fresh yeast will be needed to substitute the dry yeast. My recipe calls for a tablespoon of yeast, which weighs 11 grams. When using fresh yeast, you will need 42 grams.
- It should still be proofed the same way (by creating a starter) before adding the remaining ingredients.
- Everything else stays exactly the same.
There’s a new overnight rise?
Yes! And I can’t believe I haven’t thought about it before. Make the dough at night so you can slow-rise it overnight. Bring a pot of water to boil and place a plate over the top. Turn the heat off, and place your bowl on top of the plate. Let it sit overnight for the dough to double in size, and you’ll be able to make a fresh batch of tsoureki in the morning. So easy!
What is the “dryer trick” rise?
I’m not the most patient girl in the world, so, I look for shortcuts without sacrificing quality. This is one of my favorite shortcuts because it helps yeast bread doughs rise much faster. Here is how to do it right:
- Place some clean, dry towels in the dryer and run it for 10 minutes.
- Turn the dryer OFF.
- Place the bowl of dough (covered with plastic wrap or a kitchen towel) into the dryer and close the door. If the dryer is super hot, leave the door cracked open. The temperature should be warmer than your room but, not too hot.
- Leave the dough in the dryer until it doubles in volume. Brioche (tsoureki) doughs take about an hour and a half to rise.
- Take the dough out and follow the remaining instructions.
What is a cold-rise?
A cold-rise basically means that the dough rises in a cool environment, aka, the refrigerator. Once the dough is kneaded, transfer it to a large greased bowl and cover it with plastic wrap. Place it in the refrigerator so that the dough can rise slowly, overnight. This is done for convenience and to deepen the flavor. As the yeast ferments slowly, it adds more flavor.
The following day, take it out of the refrigerator and shape it. Place them on a baking tray lined with parchment and set aside in a warm spot to rise. Before shaping them, it’s a good idea to take the dough out of the refrigerated container and set it aside (either on the counter or in another bowl) to warm up a bit. An hour should be plenty of time. Proofing the dough too long will give it a bitter flavor so, be careful with this step. If you have any questions, let me know in the comments section, below.
Why didn’t my dough rise?
A few things could’ve gone wrong to cause this. But, before we get into that, let me say that tsoureki dough is a rich and dense dough. Therefore, it will take longer to rise than doughs that do not contain eggs, butter, and milk. So, it will take about 2 hours (or longer) depending on the temperature in your home. If you use my “dryer” trick, the dough will rise a little faster. About 1 and 1/2 hours. Allow it to take its time. You can also do a cold rise overnight in the refrigerator. I will talk about that in another section down below. Now, let’s get to the possibilities of why the dough did not rise:
- The yeast was not proofed. Proofing is essential. Proofing properly is also important. In order to proof the yeast properly, the milk should be lukewarm (about 115 °F). If it is too hot, the yeast will die and if it is too cold, the yeast will never activate. Also, make sure that the eggs are also at room temperature.
- The dough was not put in a warm place. My favorite place to allow the dough to rise is in my dryer (See dryer trick section, below). You can also let it rise in the warmest room in your house. The oven works too. Make sure that it is OFF and the oven light is on. The light will produce a little bit of heat.
- Placing the dough in a HOT place (such as an oven that is on or a very hot dryer) will kill the yeast too. It has never happened to me at home. However, it has happened at our restaurant when I used to proof yeast over the stovetop, on a shelf.
If you proof the yeast, knead it as per the recipe instructions, and then, set it in a warm area to rise, it will work every single time.
Keep in mind that this is a dense dough and can take over 2 hours to rise.
The dough spread out and did not hold its shape.
From my experience, any of these two things could have happened:
- The second rise was too long. Once the dough is shaped (into braids, twists, wreaths, or whatever your favorite shape is) it needs to rise again. This time, the rise should not be as long as the first time. This time, we’re not looking for the dough to double in size. 25-30 minutes in a warm room should be sufficient. The braids should puff a little. They’re ready when they hold your finger indentation. If they deflate, they have risen for too long. Just deflate and re-shape them and set aside to rise for 25 minutes. If they rise too long and are then, baked, they spread or deflate in the oven.
- There was too much liquid and not enough flour in the dough. Basically, my advice is to weigh the flour using a kitchen scale. This is the best way to ensure that the right amount of flour was added. I give both (metric, in grams and cups) measurements for the flour. The problem with using cups is that everyone fills the cups differently. Therefore, the end result will vary each time. The dough should be soft and tacky but not sticky. If the correct amount of flour (720 grams per batch) was added and the dough is still sticky after kneading, try adding 1-2 tablespoons of oil and then knead it a little bit longer. Once the stickiness goes away, then it is ready to be transferred into a lightly greased bowl, covered and set aside to rise.
However, if the dough still feels a bit sticky, add a quarter cup of flour, knead it, and it should be fine. Adding too much flour will produce very dry tsourekia.
Practice makes perfect. Once you make a few batches, you will become more familiar with the dough and how it should feel and look and you will create the most delicious tsourekia.
Will the tsoureki stay soft the following day?
Tsoureki tastes best the day it is made. Nothing beats freshly baked bread. However, It will still retain most of its flavor if stored properly.
The best way to keep this sweet bread soft is to store it in an airtight container or wrapped in plastic, or, both. Allow the tsoureki to cool down completely after it is baked. Then wrap it in plastic or put it in an airtight container.
Freezer Instructions:
The sweet Easter bread will keep fresh in the freezer for up to 1 month. I recommend wrapping the loaves in plastic, then foil, then place them in a freezer bag or freezer-safe container. This will keep them from drying out or absorbing freezer odors.
Thaw the sweet bread overnight in the refrigerator and then let it come to room temperature before serving. It will taste delicious!
Refrigerator Instructions:
Allow them to cool and then either place the loaves in an airtight container or wrap them in plastic wrap. If using the plastic wrap, add a second layer of protection with a freezer bag or container. I mean, you made the sweet breads with so much love so that you and your loved ones can enjoy them for days!
How long should I bake the tsoureki?
Baking times are my enemy when writing recipes. Arghhh! I hate them, especially with baking recipes.
Most ovens vary:
- Some ovens have hotspots in a particular area
- Some are not callibrated and the temperature setting is not accurate
- Placing dough, batter, etc, on all of the racks causes the temperature to drop and this results in longer baking time
- opening the oven drops the temperature as well.
- convection ovens cook faster than non-convection ovens
- the size of the bread also varies: smaller loaves will bake faster than larger loaves
- Do you see why I hate it?
So, here are some words of wisdom:
- If you are making smaller loaves like the small stuffed wreaths that I made in this post, then they will take between 20-30 minutes to bake. Look for color. Check them at the 20 minute mark and if they’ve already developed that beautiful golden color, take them out and insert a toothpick. If the toothpick comes out clean, they are ready. Try not to overbake them or they will be dry. I’d rather slightly underbake and let them sit at room temperature undisturbed. They will continue to bake a little as they cool.
- You can also use a thermometer and once it registers 190 °F in the center of the bread then, they’re ready.
- If you are doubling the recipe, the second, third, fourth tray will take longer to bake simply becasue the oven’s temperature drops each time it is opened.
- It will be confusing the first and second time but, after making this bread a few times you will get to know it well enough to judge better.
Why is my tsoureki crumbling?
The characteristics of a really good tsoureki are the following:
- pillowy soft texture
- it is stringy and does not crumble easily
- the beautiful golden color on top
That’s it! Is that too much to ask? haha!
Kneading the dough too little creates a crumbly cake-like texture. Bread flour requires less kneading. About 10 minutes. However, I like to knead a few minutes longer to ensure the perfect texture. So, the answer is, knead it longer. If you own a tabletop mixer such as a kitchen-aid, this is the time to use it. But, if you’re going to knead it by hand, then, knead for double the time so that you end up with a great tsoureki. Here is my favorite brand.

Can I make tsoureki with all-purpose flour?
Yes, you can! As I am writing this post we are in a stay at home order due to an outbreak. Bread flour is nowhere to be found. Each time we go to the market it is sold out. This was a blessing in disguise because it forced me to test my tsoureki recipe and perfect it using all-purpose flour. I’m so happy to say that it worked perfectly!
The trick to this is in the kneading time. It needs to be kneaded (lol) for double the time! So, if you’re making this in a stand mixer then knead it for 15 minutes total. Kneading by hand will take even loger. About 20-25 minutes.
Knead it very good then allow it to rise and it will be perfect!
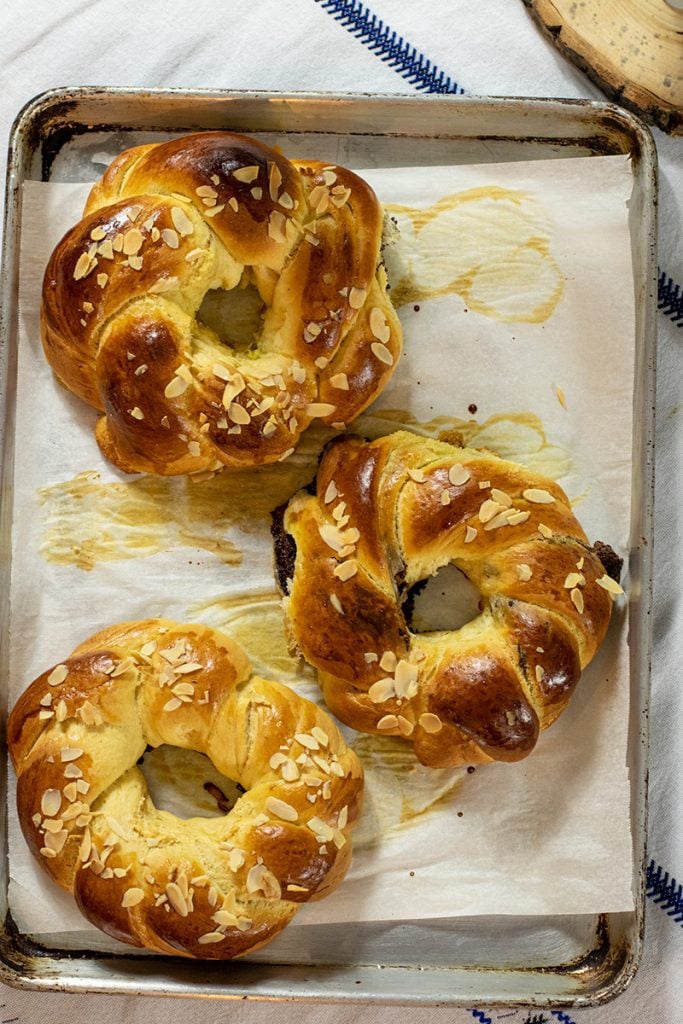
Can I bake the loaves with Easter eggs?
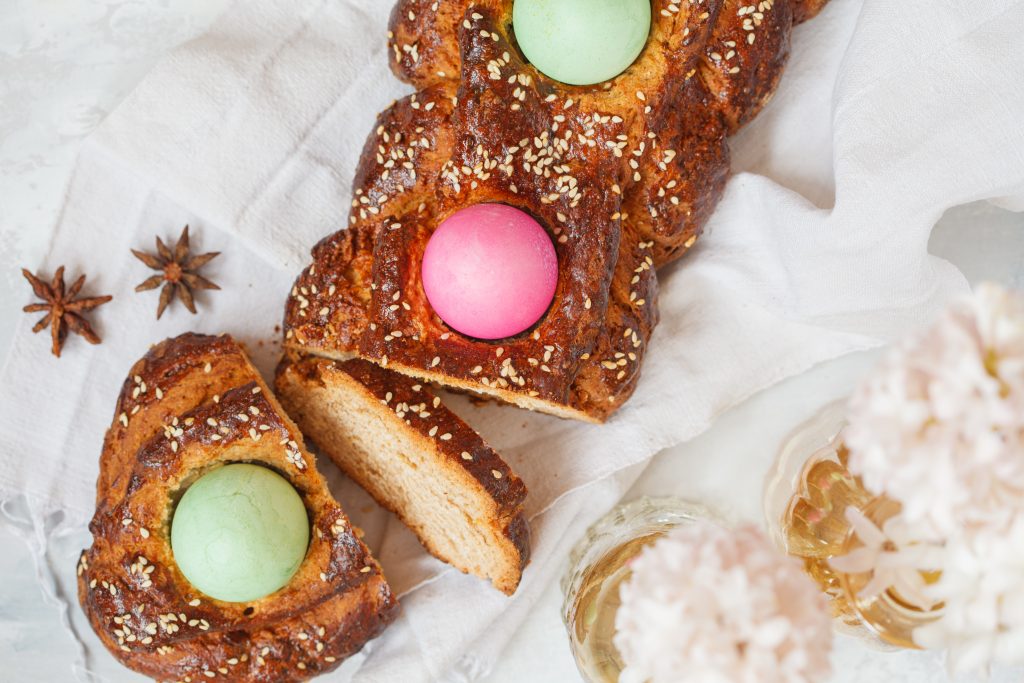
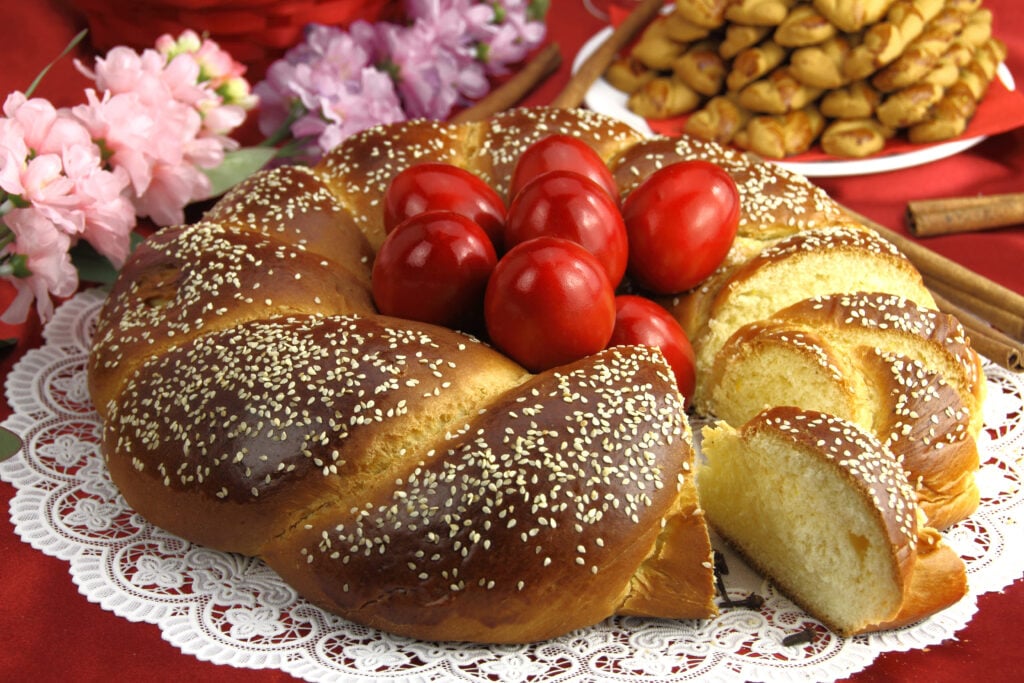
Yes! You can add the painted boiled eggs after the loaves are shaped. Then, let them rise, and bake as usual. Alternatively, you can crumble up some parchment paper and place it where the eggs will go after the loaves are baked.
Keep in mind that making tsoureki gets better each time that you bake a batch. Like I said before, ovens vary, flour varies by brand, and practice makes perfect. So, make some this week and let me know what you think in the comments, below.
Disclosure: Bear in mind that some of the links in this post are affiliate links and if you go through them to make a purchase I will earn a commission. Keep in mind that I link these companies and their products because of their quality and not because of the commission I receive from your purchases. The decision is yours, and whether or not you decide to buy something is completely up to you.
Here are links to my favorite tsoureki recipes on this blog:
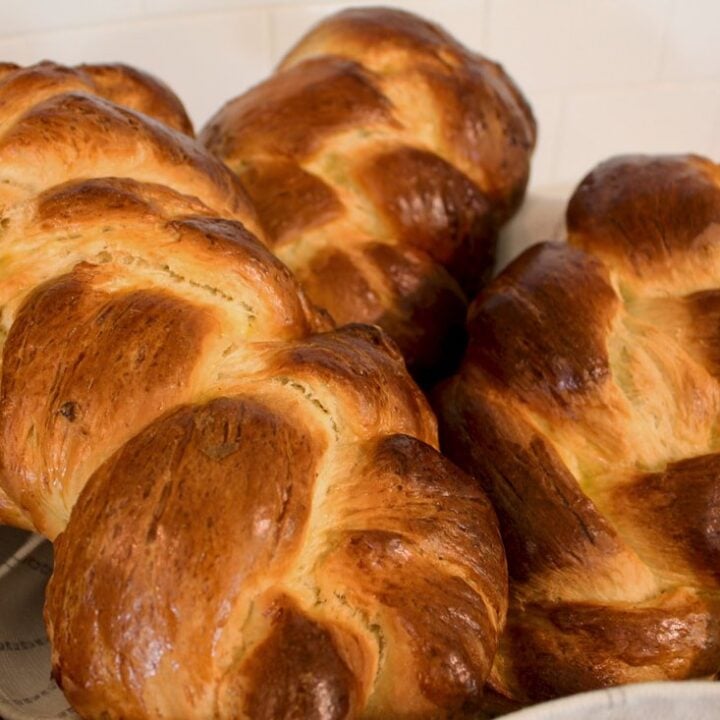
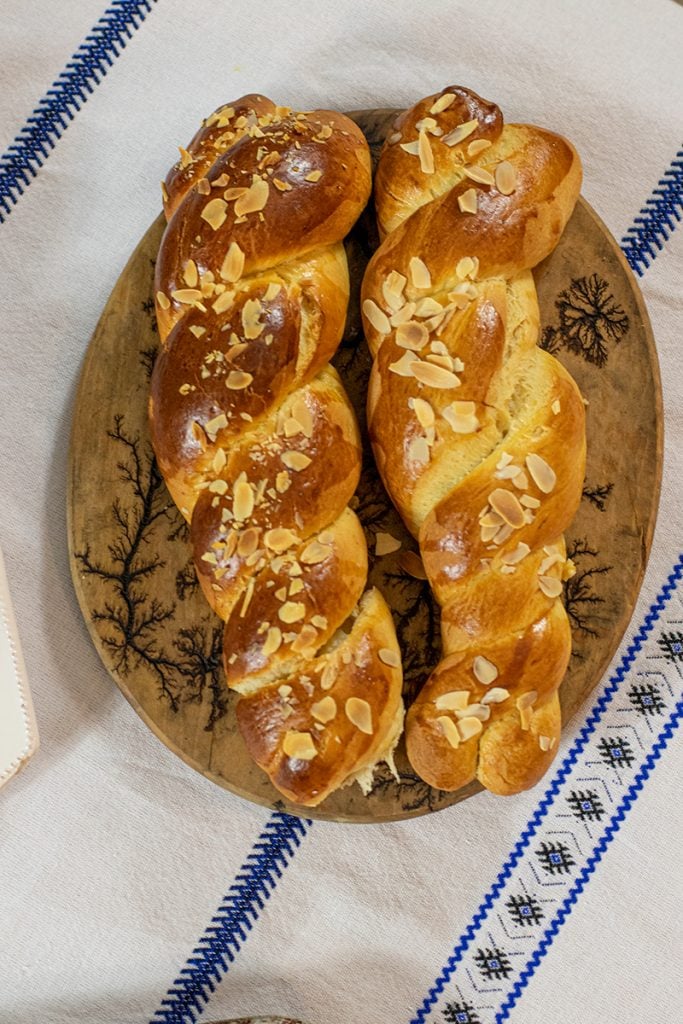
TSOUREKI: Greek Easter Bread
This traditional Greek Tsoureki is a rich and fluffy sweet bread, delicately scented with orange zest, mahlepi, and mastic. It’s the classic centerpiece of Greek Easter celebrations, beautifully braided and golden, sometimes adorned with red eggs or sliced almonds. My updated method includes an easy overnight proofing trick to help you bake fresh tsoureki on Easter morning with less stress. Perfect for beginners, this recipe includes a clever steam-proofing tip that makes all the difference in texture and flavor.
Ingredients
For the Starter:
- 1/2 cup lukewarm milk
- 1 tablespoon active dry yeast
- 1 teaspoon sugar
- 2 tablespoons all-purpose flour
Dry Ingredients:
- 4 to 4 1/2 cups (720 g) bread flour
- 1 cup (240 g) granulated sugar
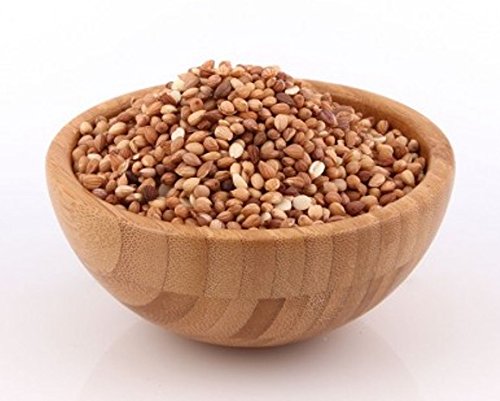
- 1 tablespoon ground mahlepi
- Zest of 1 orange
- 1/2 teaspoon salt
- 1/4 teaspoon ground mastic gum (optional)
Wet Ingredients:
- 3/4 cup (177 ml) lukewarm milk
- 2 large eggs, beaten
- 2 teaspoons pure vanilla extract
- 4 oz (113 g) unsalted butter, softened at room temperature
For the Egg Wash:
- 2 egg yolks
- 2-4 tablespoons milk
Optional Fillings & Toppings:
- Sliced almonds, hard-boiled dyed Easter eggs
- Dried cranberries, raisins, candied fruit, chopped nuts, ground cardamom
Instructions
- Activate the Starter: In the bowl of a stand mixer, combine 1/2 cup lukewarm milk, yeast, sugar, and flour. Whisk together and set aside for 10 minutes, until a puffy cloud forms.
- Mix the Dry Ingredients: In a separate bowl, whisk together the flour, sugar, orange zest, salt, mahlepi, and mastic gum.
- Form the Dough: Once the starter is ready, add the dry ingredients, lukewarm milk, eggs, and vanilla extract to the mixer bowl. Knead on low speed for 8 minutes.
- Add the Butter: Add the softened butter and increase the mixer speed to medium. Knead for 2 more minutes, until the dough is smooth and elastic.
- First Rise: Transfer the dough to a lightly oiled bowl, cover with plastic wrap, and let it rise in a warm spot until doubled in size (about 1.5 to 2 hours).
Quick Rise Tip: Heat 3–4 clean towels in the dryer for 5 minutes. Place the dough bowl on top of the warm towels inside the dryer (make sure it’s OFF). Close the door and let rise.
- Shape the Loaves: Punch down the dough and divide it into 2 equal parts. Cut each part into 3 ropes and braid. Repeat to form two braided loaves.
- Second Rise: Place the braids on a parchment-lined baking tray. Cover and let rise until puffy, about 30–40 minutes.
- Prepare for Baking: Preheat oven to 350°F (180°C). Brush the loaves with egg wash and decorate with optional toppings.
- Bake: Bake on the center rack for 30 minutes or until golden brown.
- Cool and Serve: Let the bread cool for at least 30 minutes before slicing. Wrap well to store or freeze for up to 1 month.
Notes
- Steam-Proofing Method: For a gentle, overnight rise, bring a pot of water to a steam, turn off the heat, and place a plate over the pot. Set your dough bowl on the plate. As the water cools, remove the plate and let the bowl rest directly over the warm pot. This helps the dough rise slowly and steadily overnight. In the morning, shape, rise, and bake your tsoureki fresh.
- Add dried fruit, cardamom, or nuts into the dough for added flavor.
- Mahlepi and mastic gum give tsoureki its signature taste; they can be found at Mediterranean or Greek grocers.
- Don’t let the braided loaves overproof after shaping; they should become puffy, not doubled.
- Once baked and cooled, wrap tightly to freeze and enjoy later.
Flour Tip: All-purpose flour will yield a softer, more cake-like texture. Bread flour creates the signature stringy, chewy texture of classic tsoureki. If using all-purpose flour, knead the dough 5 minutes longer to develop enough gluten.
Recommended Products
As an Amazon Associate and member of other affiliate programs, I earn from qualifying purchases.
-
 Mastic Gum – 0.6oz
 -
Traditional Greek Mahlepi Whole (Mahlab) - 10g
-
Nordic Ware Natural Aluminum Commercial Baker's Quarter Sheet, 2-Pack
-
KitchenAid KSM3311XAQ Artisan Mini Series Tilt-Head Stand Mixer, 3.5 quart, Aqua Sky Blue
-
lasenersm 2 Pieces Dough Scraper Bowl Scraper Food-safe Plastic Dough Cutter Flexible Plastic Scraper Bench Scraper Multipurpose Food Scrappers for Bread Dough Cake Fondant Icing, White, Green


Great! Thanks for the info. A friend of mine uses both powdered sugar and granulated sugar I. Her tsourecki. Have you ever heard of this? Thx
I have not. I’ve tried making it many ways have also failed miserably in the past using bad recipes. This one has been tried and tested and works every time. I hope that you enjoy it 🙂
Is this recipe for on loaf or for 2 smaller loaves. I made it. They came our good, but they are smaller 13″ loaves – not huge.
Still in the oven so I don’t know how they will taste. I cook by bread to and internal temp of 190 degrees. Does this agree with your settings? I struggle with this recipe, but not other breads.
Since there isn’t a recipe on this post I am assuming that you either made the stuffed or the traditional plain braids. It is the same exact recipe anyway, for both 🙂 So, it makes 2 large braids or 6 smaller twists/wreaths. Hope this helps.
Another question – can you substitute orange juice for the milk?
You can do half water and half orange juice 🙂
Hi Dimitra, have you tried using bread improver, and what do you think of this.
Hi Dimitra, this is my first attempt at tsoureki, despite having living in Athens for 25 years. Everything looked exactly like it should until the proofing stage. But the dough hasn’t risen much at all sadly. Now it may be because I only had all purpose flour and I didn’t see this new, updated recipe and hints until too late. I didn’t knead it for the extra time. But I also wanted to ask if you know whether or not our dry yeast in Greece is the same strength as yours in the U.S.?
It smells great though so won’t go to waste, I’ll just have to have another go to get things right!
On my goodness! These are amazing! We are shoveling them in! Light and delicious! Mine do not look pretty but they taste wonderful!
Why does tsoureki get dense after it cools?
Hi Dimitra- I made your tsourekia today ( both stuffed/with nutella and plain) and they were absolutely amazing. I ate tsourekia for years when I lived in Athens in the 80’s, from the best bakeries, and these turned out EVEN better!!! Bravo!!! One little comment, I added 4 1/2 cups of flour as your recipe indicates, but as I was mixing seemed a bit drier then in your video, so I added 1/4 extra milk as was mixing and texture turned out perfect. Next time I think I will use 4 cups flour and the exact amount of milk in your recipe.
I followed your video ” the best greek tsoureki recipe “on youtube, printed recipe and found discrepencies, in video you said 2 cups of sugar, printout says 1 cup, in video you used 3 eggs , on recipe says 2 eggs
i follwed video, and dough was way too sticky , added one more cup of flour
it was my first time to make this bread for my greek friend,waiting for dough to rise
did i use too much milk? 3/4 cup for wet ingredients and 1/2 cup for yeast ?
thanks
happy easter to all
Hi! Would Fleischmann’s Rapid Rise yeast work with this recipe? Thanks!
Yes 🙂
Thank you!! This really helped me!
Hi Dimitra, if I want to make 6 large tsourekia what is the quantity of ingredients I need.
Thx
I want to make this recipe using an egg substitute (allergies), what would you recommend as an egg wash alternative?
1. If the eggs are dyed but raw, they will bake in the bread. No need to stuff the indentations.
2. If the loaves are about 10 ounces, they take 20 minutes. A half hour is for larger loaves. In either case, this includes any
braided loaves.
3. If the oven keeps the correct temp, rap the bottom of the loaf. If it has a hollow sound, it is done. No need for
toothpicks or temp gauges.
4. If the home has zone heating, crank it up in one room to about 80 degrees and close the door. When the dough needs to
rise the first time, place the bowl in the room. Should take about half hour to 45 minutes to double in size.
5. If making many loaves, those pans can not go inter the oven together, so cover each waiting pan with wax paper or
plastic wrap to prevent any skin from developing.
6. instead of adding more oil to the dough if sticky, apply the oil to your hands and knead. Saves time.
Thank you for that!!!
It’s time to bake the Tsoureki! In many ways, baking it is similar to baking other breads. But, there are some tricks that can make the process go much smoother. You have put together a very helpful guide.
Thank you!! SO glad that it’s helpful. All the best!!
Gia sou xrusoxera. Is it ok to substitute Mastiha liqueur for the mastiha gum and if so, how much would you use?
S’euxaristw poli.
Hi!! You’re so sweet!! Yes, A few people on Facebook have used it with great results. half to 1 teaspoon is what they used 🙂
What would be a good substitute for mahlepi?
Anise seeds would be good. A tablespoon of them or maybe more 🙂
Kali mera Dimitra!
Can this recipe be doubled and if so is it an exact doubling or are some ingredients reduced?Or am I better off making two batches of dough separately the combining for the rise?
Yes, you can make them separately and then combine for the rise 🙂
I have made this 3 times. On the 3rd time I added 2 packages of dry yeast. It did rise in 2 hours. YEA!!
Help Dimitra. I tried making your tsoureki which was somewhat similar to my mom’s and my yiayia’s. I did need to add more flour. It was soooo sticky that I couldn’t get it off my hands (I buttered my hands), never mind rolling it for the braids. I added some more butter because of added flour. I made a batch yesterday and cooked it for 40 minutes because all my tsourekia recipes I have said 40 minutes—it burned on the bottom (not the top) as you might have guessed. I made more today (still had to add more flour) and cooked it for 30 minutes as you instruct. Same result—the bottom burned. I’m afraid that if I cook it for 20 minutes, it won’t cook through. I know my oven temp is ok because I also just made koulourakia and they came out fine. Any suggestions? Tsourekis were average size.
Do you have a recipe for BREAD MACHINE TSOUREKI?
I do not own a bread machine, sorry!
Dimitra,
Today I made the Tsoureki recipe. I have made them before, but wanted to try your method and the end result was great. However during the process I was quite worried — the dough was VERY sticky after the first rise and so difficult to knead and cut into ropes. I tried adding more flour, but did not want to add too much making it too dry. The breads look good in the end, I think they will taste good. Instead of crushed mastic, I substituted a dash of masticha liquor and reduced the milk a bit. Any advice to avoid the extreme stickiness?
TY — I enjoy your videos. I am of Greek descent as well —
Andrea
I’m so glad that you didn’t go heavy on the flour. That ruins the bread 🙂 Olive oil will fix the stickiness. Pour some oil on your hands and knead it a few times and the stickiness will go away and the dough will remain nice and soft 🙂 Hope that helps!
THE RECIPE LEAVES OUT STEPS. iT DOES NOT REFER TO MIXING EGGS WITH THE VANILLA AND THERE ARE NO INSTRUCTIONS FOR ADDING THE MILK.
Hi
I live in Australia and I just want to check the measurements. Our table spoons measures 20mls and cups are 250 mls. Is this the same as your measurements?
Hello Koukla, I’ve been following your recipes and love the simple ways to make greek classics and other recipes. The Tsoureki recipe has been my Achilles heal. Sometimes it works and other times not so much. Your recipe and step by step video is the ultimate guide. My MIL had a recipe everyone who’s tried it raves about. I was never able to duplicate it. My husband says yours is as close to his mom’s as he can remember; that says a lot! Thank you for all you do!
Thank you for sharing this recipe, Dimitra. I tried it as a newbie and my first time ever baking it was a success! I am going to try your Easter cookie recipe next week and also will try adding some chocolate to this year’s tsoureki. Thank you again. I feel empowered and confident thanks to your detailed steps.
Can I make the tsoureki a bit sweeter? If so, how much more sugar can I use. Or should I use other sweeteners? Please advise.
Please provide me with alternative seasonings . I’m Italian and want to try this bread for Easter . I value your standards of precision .
Dimitra can this recipe be doubled.
I would like to try the cold-rise method. Is it ok to leave the dough in the refrigerator for 24 hours?
I do not recommend the cold rise method. It takes such a long time for the tsoureki to come to room temperature and then to puff after it is braided…
Hi Dimitri, many years back I tried a tsoureki that I loved but never asked for the recipe! It was on the dense side. Would you know how could I use your recipe and make it more dense? What exactly makes it dense? Thanks so much
This version is on the dense side 🙂 You will love it!
Hi I wanted to add orange juice to where and how much can I add please?
Dimitra I love your recipe!! you always explain everything so well.. Thank you!! 😊 I will double this recipe to make more TSOUREKIA
Made my first Tsoureki following your recipe. Step by step, didn’t rush anything ….use a small space heater to keep the room warm while
The dough was rising. I don’t bake …I can’t . Everything I bake is horrible. THIS WAS A SUCCESS!! . My family loved it! I loved it!!! Thank you for this perfect recipe!
Hi Dimitra,
Can I use my sourdough starter to make the classic tsoureki, instead of using yeast?
Thanks
Hi! Yes, you can definitely use your sourdough starter to make tsoureki instead of using yeast. It will give the bread a slightly tangy flavor and a lovely texture. Here’s how you can adapt the recipe:
1. **Use your sourdough starter**: If your starter is active and bubbly, you can use it in place of the yeast. Typically, you would use 1 cup of active starter to replace 1 packet of yeast. Since tsoureki usually requires a lot of flour, you may need to adjust the flour and water in the recipe slightly to accommodate the hydration of the starter.
2. **Adjust the rise time**: Because sourdough tends to rise more slowly than yeast, expect a longer proofing time. You can let the dough rise for 4-6 hours at room temperature or let it rise overnight in the fridge.
3. **Activate your starter**: Before using your sourdough starter, make sure it’s well-fed and at peak activity to ensure a good rise.
The result should be deliciously soft with that distinctive sourdough flavor. Enjoy your homemade tsoureki!
Hi Yiassou Dimitra,
I enjoy your recipes…
Question… I’ve been making TSOUREKI for many many years… I was just wondering if I make it ahead and freeze it, I know it’ll last and taste great, but my question is when you defrost it, will it last a few days afterwards, for everyone to enjoy with a cup of coffee in the mornings as always, or will it go bad quickly because it was pre-frozen?
I’m having a lot to do this Easter and would like to be ahead of things so that I’ll be organised.
Thank you muchly ❤️
Hi Dimitra, Can the tsoureki be par baked so that I can mail it to my brother in California from Texas? If so, would you give me instructions on how to do it please? Thank you!
Hi there! Tsoureki isn’t ideal for par-baking, as it won’t maintain that signature fluffiness. Instead, I recommend fully baking the tsoureki, allowing it to cool completely, and then wrapping it tightly in plastic wrap and aluminum foil. You can even vacuum-seal it for extra freshness. Once it’s wrapped, you can mail it to your brother, and he can enjoy it right away. It should still be soft and delicious when he receives it!
I remember, growing up, having a Plastic baby or a dime baked in the bread. The finder would be blessed with luck that year….is my memory correct?
Yes! You’re remembering the tradition of **Vasilopita**, the Greek New Year’s bread (or cake), where a **coin** is baked inside. The person who finds the coin in their slice is said to have **good luck and blessings for the year ahead**. Some families may have used a small plastic baby or a dime instead, but traditionally, it’s a coin.
This custom is also found in **other cultures**, like the **French Galette des Rois (King Cake)** and even the **New Orleans King Cake**, where a baby figurine is sometimes hidden inside. Such a beautiful tradition—did your family bake it every year? 😊
would love to be able to use my sourdough starter and allow the dough to ferment in the fridge overnight for the added health benefits but I don’t know how to adjust the recipe. I’d really appreciate and tips you may have. Thank you
Hello there
Just wondering, could I leave the tsoureki dough on my kitchen table overnight for the first rise? or is it too many hours?
Thanks
I would like to know the measurements if you wanted to make around 10 Tsourekia. I noticed the yield was only 2.
Hi Dimitra I hope you can shed some light here. I know we cannot bake on Holy Wednesday or Good Friday… so I’ve only got Holy Thursday to knead and bake the TSOUREKI. I’m worried that I won’t have enough time for the dough to rise sufficiently by the afternoon as I’ll be taking the dough with me to my daughter’s house to bake with my grandkids. The weather will not be hot, so it’s a gamble. What do I do????? 🙏
Why did my bread come out dark. Was it the egg wash?
Yes, it’s likely the egg wash! If you used a whole egg or brushed it on too thick, it can make the crust darker, especially if your oven runs hot or you baked it a little longer. Next time, try using just the yolk mixed with a splash of milk or cream and brush on a very thin layer. You can also loosely tent the bread with foil during the last part of baking to keep it from getting too dark. It should still come out beautifully golden without over-browning!
Can you used salted butter? Does it make much of a difference?
thanks kindly
My bread came out very heavy and dense. What could have I done wrong ?
In your recipe you write 1/2 cup milk to starter, but in your video you say 1 & 1/4 cup. which measurement should I use. Thanks
In your recipe you write 1/2 cup milk to starter, but in your video you say 1 & 1/4 cup. which measurement should I use. Thanks
Γειά σου, χρόνια πολλά!
I’m a little frustrated. I thought this was going to fix all my problems with my bread 😞. I can not figure out if I’m not kneading it enough or proofing it enough. I also think that maybe the water was too hot. on the plate. it came very dense. I make your loukoumades and they come out great. i made a comment on your page that the dough didn’t completely pull off the bowl. is that normal.? I fail at this every easter and new years. I use the same recipe for Vasalopita. Do you have any suggestions.
thank you
Dora
Γεια σου Dora! Χρόνια πολλά! 😊
Don’t get discouraged! Tsoureki is one of the trickiest Greek breads to master, and even experienced bakers struggle with it from time to time.
If the bread came out dense, a few things could have happened. Water that’s too hot can damage the yeast, underproofing is a very common culprit, and sometimes the dough simply needs more time to develop properly. The dough should be soft, elastic, and slightly tacky. It’s completely normal for it not to pull completely away from the bowl, especially in the beginning. In fact, adding too much flour is one of the most common reasons tsoureki turns out dense.
My first suspicion is usually proofing. The dough should look noticeably puffy and almost doubled before moving on to the next step. If your kitchen is cool, it may need much longer than the recipe suggests.
Don’t give up! If you’d like, tell me exactly how long you kneaded it, how long you let it rise, and whether you used instant or active dry yeast, and I’ll help you troubleshoot it. We will get you that beautiful fluffy tsoureki! 💕