
This is the best homemade bread I’ve ever eaten and the best homemade bread you’ll ever eat, too!
This recipe came about by accident. When I shoot videos, I make a couple of different batches so we aren’t filming for 24 hours straight. I was filming for my koulouria thessalonikis, which are sesame bread rings, and had an extra batch left in my refrigerator. It was sitting there for at least 2-3 days and making more bread rings just seemed like too much work. I didn’t want to throw it out! So, I formed it into a ball, threw some sesame seeds on top and baked it.
It made the absolute best bread I’ve ever had in my life! It was crusty on the outside, super moist on the inside, and I just had to make it again to see if what happened really happened. I’m happy to say that I’ve perfected it. I’ve made it many times since then and it comes out great every time.
I’m so excited to share this delicious bread with you!
Let’s go over the ingredients:
- 1 and 1/2 teaspoons dry active yeast
- 2 teaspoons sugar
- 1 and 1/2 cups tepid water
- 2 cups all-purpose flour
- 2 cups bread flour
- 1 teaspoon sea salt
- 1/4 cup olive oil
- Sesame seeds (optional)
Proofing yeast
Begin by proofing the yeast. Combine the yeast, water, and sugar. Stir to combine completely and set aside about 8-10 minutes until the yeast is activated. It is ready when a puffy cloud forms over the water. The longer it sits, the bigger the cloud will get, but it should be ready to use in about 10 minutes. If it doesn’t form a cloud, throw it away and get some new yeast because it means that the yeast has gone bad. So make sure you proof your yeast before combining it with the other ingredients.
Making homemade bread dough
Combine both flours with the salt in the bowl of a tabletop mixer and mix the ingredients to combine. Add the yeast mixture and the olive oil. With the dough hook attachment, knead on low speed for 7-8 minutes.
This can also be done in a large bowl by hand. The kneading time will increase to 10-12 minutes or until the dough is soft and smooth.
Place the dough in an oiled bowl covered with a kitchen towel or with plastic wrap. This will allow the dough to rise freely. Set it aside in a warm place to rise until it’s doubled in size. It takes about 45 minutes to 1 hour, or it may take a little longer if it’s cold in your house.
Punch the dough down and form into a ball. You may also form it into a baguette, but I prefer the round shape.
Place the formed dough onto a half sheet pan lined with parchment paper and cover it with a clean towel again. You want it to sit for another 30 minutes to double in size.
The crusty outside
While your dough is rising, let your oven preheat, too. If you have a cast-iron pan and a pizza stone, place the cast iron pan on the lowest rack of your oven and the pizza stone on the middle rack. Turn on your oven and allow them to warm while the oven is preheating. This prevents your pizza stone from cracking and will create a bakery-style bread that’s crusty on the outside and soft on the inside.
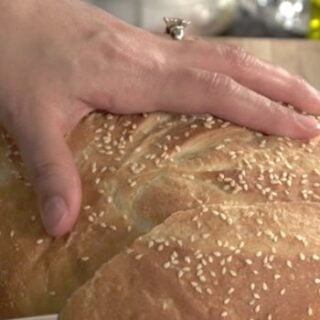
Once you have a nice puffy dough, you brush the top of the dough with ice water. Make 4 decorative slices on top and sprinkle with sesame seeds. If you don’t like sesame seeds, you don’t have to use them.
As soon as you put the bread in the oven to bake, pour 1 cup of your ice water in the cast iron pan to create steam. This will help create a nice crusty top. When you place the bread on the pizza stone, it gives you an extra crispy bottom crust.
Give your bread at least 30 minutes to rest and allow the steam to distribute throughout the bread.
Then, you just enjoy the best homemade bread you’ve ever made!
Don’t forget to try my sesame bread rings, and my other bread, too. Kritsinia Greek breadsticks, Eliopsomo Greek olive bread, and Lagana bread are just a few delicious options.
THE BEST HOMEMADE BREAD RECIPE
Ingredients
- 1 and 1/2 teaspoons dry active yeast
- 2 teaspoons sugar
- 1 and 1/2 cups tepid water
- 2 cups all purpose flour
- 2 cups bread flour
- 1 teaspoon salt
- 1/4 cup olive oil
- Sesame seeds (optional)
Instructions
- This bread really is outa of this world delicious. You MUST try it once!
- Begin by proofing the yeast. Combine the yeast, water, and sugar and mix. Set aside about 8 minutes until the yeast is activated. It is ready when a puffy cloud forms over the water. Your yeast is good and ready!
- Combine the flour with the salt in the bowl of a tabletop mixer and mix the ingredients to combine. Add the yeast mixture and the olive oil. With the dough hook attachment, knead on low speed for 7-8 minutes.
- This can also be done in a large bowl by hand. The kneading time will increase to 10-12 minutes or until the dough is soft and smooth.
- Place the dough in an oiled bowl covered with a kitchen towel or with plastic wrap. Set aside to rise until doubled in size. This takes about 45 minutes to 1 hour. It may take longer if it is cold in your home.
- Preheat oven to 500 degrees Fahrenheit, 260 degrees Celsius.
- Tip: If you have a cast iron pan and a pizza stone place the cast iron pan on the lowest rack of your oven and the pizza stone in the middle rack. Place them in the oven while the oven is cold so that the pizza stone does not crack. Let them warm while the oven is preheating. Doing this will help you create bakery style bread rings. Crusty on the outside and soft on the inside.
- Punch the dough down and form into a ball. You may also form it into a baguette. I prefer the round shape.
- Place the formed dough onto a half sheet pan lined with parchment paper and cover with a clean towel. Set aside to rise about 30 minutes. It will almost double in size.
- Brush the top of the dough with water. Make 4 decorative slices on top and sprinkle with sesame seeds if desired.
- To create a nice crusty top, pour 1 cup of ice water in the cast iron pan to create steam. Place the baking tray with the dough on it on the middle oven rack. Reduce the oven temperature to 450 degrees Fahrenheit, 232 degrees Celsius. Let it bake for 30 minutes.
- Remove the bread from the pan and place directly onto the pizza stone and bake 5 more minutes. This will make the bread have an extra crispy crust.
- Allow the bread to rest at room temperature at least 30 minutes before slicing. This will allow the steam to distribute throughout the bread and create a very moist interior.
- Warm the bread in the oven for 5 minutes before slicing.
- Enjoy!
Well, this is the last time I will try this recipe. I have made 4 loaves and they were all gooey after cooking. My dough looks and acts like your dough but after the first rising it is way to gooey and when I set it to rise it spreads out like a pancake. I followed your recipe precisely and watched that video 3 times! I did add more flour while at the same time allowing it to be more “moist” as you said but no go. I LOVE all your recipes and even successfully used this one for the twists with feta but for bread it was not a winner. I am sure it’s me…. oh well. At least I tried right? Thank you for all of your kind generosity just the same young beauty.
Hi Margaret! I’m so sorry that you’re experiencing this. I make this bread so often and hope we can troubleshoot to figure out what’s going wrong.
It sounds like the dough needs a lot more flour. I will take a look at the recipe and make it once more to see if maybe I have to adjust it. But, if you’re willing to I’ve it another try go ahead and add more flour so that it’s tacky, not sticky. See if that solves the problem and let me know 🙂 All the best, Dimitra
This cracked my Pizza Stone ,,not good at all
I did like you said ,,Pizza Stone on Middle Rack
Cast Iron pan on bottom rack ..
Preheated the oven to 500
Placed the cookie sheet with the dough on the Pizza Stone.
Reduced the oven to 450
Poured a glass of water in the cast iron pan and closed the oven. 10 minutes later i heard a crack ,i looked in the oven and my Pizza stone is now cracked i 3 piece ..$30,00 down the drain..People don’t use your pizza stone with steam.. ive used my pizza stone for 2 years and it was a nice thick one..
That’s very strange. The pizza stones are made to withstand a lot of heat. I never take mine out of the oven even when the “clean” cycle is running. Steam should not do that. The only thing that cracks a pizza stone or ceramic tiles in the oven is a sudden temperature change. So, for example, if the pizza stone was put in after the oven already warmed up, it will crack because the temperature went from cool to hot too fast. Or, if it’s taken out while hot and washed with cold water.
I’ve had pizza stones crack when those things happened or if they were too thin. Right now, I’ve been using floor tiles instead of the stone and they have not cracked at all. I’m so sorry that this happened to you. If you have extra tiles at home I recommend that those are used instead. If you have any questions regarding how they should be used. Let me know here in the comments and I will let you know 🙂
Like yours my stone always stays in the oven. I’ve been using pizza stones for many years and never had ,problems. My stone was 1/2 inch thick..
(However I have to say it is a very good bread recipe.)
I don’t know what kind of floor tile you use but if you have time let me know,.
I used this recipe for the first time today. The dough was very sticky though I decided to go with it as a test. It turned out wonderful…very similar to the Greek Bread I grew up eating from Tarpon Springs, Florida. I almost couldn’t wait 30 minutes for it to cool!
I am retired, and love to cook. I have never been fond of baking, but decided to challenge myself to make bread. I stumbled upon your YouTube video for this recipe because it looked easy, I decided to use it I was so thrilled with myself, and the outcome . The bread was picture perfect, and delicious!thanks to you! I can’t wait to try another one of your bread recipes.
5his was the best bread recipe I have ever tried and the easiest. Perfect results for the 4 times I have made it. This time I made and will place in fridge to bake the next day. I just had a question. Do I put in fridge after the first rise or second? Thank you! I love all your recipes!!
This was the best bread recipe I have ever tried and the easiest. Perfect results for the 4 times I have made it. This time I made I plan to place in the fridge to bake the next day. I just had a question. Do I put in fridge after the first rise or second? Thank you Dimitra! I love all your recipes!!
Dimitra, made your bread today. It turned out great. I think I could have cooked it a bit longer. I dont have a cast iron pan but I did puf a pan on the bottom of the oven with the ice and it turned out fine.
What if we don’t have a pizza stone? Can we still do the cookie sheet with parchment and the cast iron pan with water?
Hi Dimitras,
Loved your homemade bread recipe, easy to make and very tasty. Couple of questions for you. With the current Covid pandemic, it is very difficult to find bread flour. All purpose flour is in short supply too but it is easier to find. Can you substitute all purpose flour for the bread flour. Does it change the recipe. I find that different stove cook differently and like to use internal bread temperature to determine when the bread is ready. Can you recommend an internal temperature for your bread recipe. Thanks
Excellent directions!! Followed to a Tau! Was not disappointed!!
Thanks Dimitra!!
My mom made this amazing Honey Bread she called it Lagana. Did your mom make anything like this?
Hi,Dimitra!I love your bread recipe and I want to give it a try. But I need some help! First of all how many grams is the yeast? Can I use fresh yeast or rapid rise and how much of each? In addition 4 cups of flour is 500 grams? Finally 230 degrees celcious is in a fan oven? Thank you.
Hi,Dimitra!I love your bread recipe and I want to give it a try. But I need some help! First of all how many grams is the yeast? Can I use fresh yeast or rapid rise and how much of each? In addition 4 cups of flour is 500 grams? Finally 230 degrees celcious is in a fan oven? Thank you.
Why mix all-purpose flour and bread flour? What will happen if I use only Bread Flour – mixing White and Whole Wheat Bread Flour?
When making any dough, the amount of water varies according to the humidity in the room and also the flour.. If it calls for 1 1/2 cups of water, start with 1 cup, and adjust as needed during the mix.
The bread came out PERFECT! Thank you
Thank you so much for giving it a try!